
[toc]
Introduction
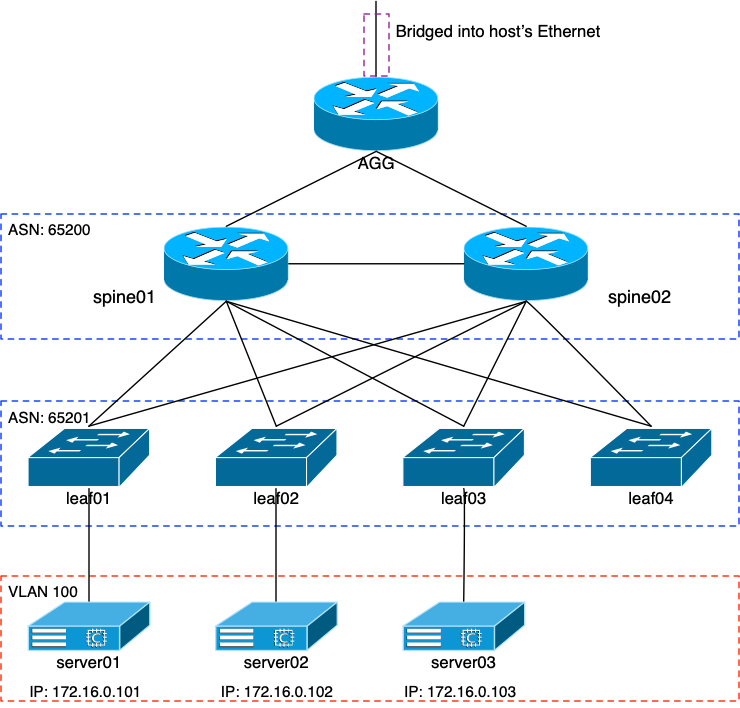
Over the course of the last few weeks or so, I’ve been working with Cumulus Linux’s VX image on VirtualBox, on my Macbook Pro. As my virtual lab grew from a few VX images to the count of ten or so, my laptop began to complain. My laptop has a 4-core 2.8Ghz Core i7 with 16GB of RAM. For most things, it’s perfectly OK. But running ten 1GB VMs began to take its toll. I really wanted a way to offload this lab to one of the servers in my basement, and I figured out a way.
FreeBSD Server
About three years ago, I built a new server here at home, and I went through the process in this post. You’ll note in that entry that I decided to shun virtualizing all of my servers in favor of FreeBSD’s jail system. At the time, the bhyve hypervisor wasn’t really where I wanted it to be as far as usability and ease of configuration. And to be fair, I really didn’t need a hypervisor and a bunch of VMs when jails were (and still are) the better solution.
In fact, this blog is running in one of the jails.
Since then, FreeBSD has been updated quite a bit, and so has bhyve. I’m not going to go into the specifics of upgrading my server, but suffice it to say: the first step was upgrading to FreeBSD 11.2 (from the 10.3 it was running… big jump). That went without too many hitches, to be fair.
joker$ freebsd-version
11.2-RELEASE-p4
VirtualBox or Bhyve?
Due to my success with VBox on my Mac, I figured I would try to get everything moved over to FreeBSD and its VBox distribution. There’s already a package set up to make installing VBox easy:
joker# pkg search virtualbox
phpvirtualbox-5.2.0_1          AJAX Web Interface for VirtualBox
virtualbox-ose-5.2.18_1        General-purpose full virtualizer for x86 hardware
virtualbox-ose-additions-5.2.18_1 VirtualBox additions for FreeBSD guests
virtualbox-ose-additions-nox11-5.2.18_1 VirtualBox additions for FreeBSD guests
virtualbox-ose-kmod-5.2.18_1   VirtualBox kernel module for FreeBSD
virtualbox-ose-nox11-5.2.18_1  General-purpose full virtualizer for x86 hardware
After installing the VBox package, I created a new VM using the same VBox image from Cumulus that I’d worked with on my Mac. That installation went fine. But when I tried to launch the VM, it failed outright. VBox refuses to load a VM if any of VBox’s shared libraries are available over soft (logical) links. Those libraries are all stored in /usr/local/lib, and on my system, /usr/local is a link to another filesystem: /local.
joker# cd /usr
joker# ls -lat local
lrwxr-xr-x  1 root  wheel  6 May  6  2016 local@ -> /local
And there’s nothing I can do about that. It’s a moronic limitation, done with the concerns of “security” in mind. Which is asinine. This is UNIX, no? Soft links are used everywhere.
The problem is that VBox on FreeBSD isn’t an officially supported product from Oracle. And I didn’t want to spend time trying to hunt down the maintainers of the package, to see if they could fix this little annoyance. So with that, I abandoned the plan to use VBox on FreeBSD.
Bhyve
Admittedly: my last exposure to bhyve was three years ago when I rebuilt the joker server in FreeBSD. At the time, it wasn’t really ready for prime time, in my opinion. So I was a bit hesitant to try it again. Fortunately, this is for a lab, meaning it wouldn’t need to be rock solid. And also: bhyve has been updated quite a bit in the past three years. So perhaps it’s time to take another look.
Installing Bhyve
I followed Dan’s Blog entry to get the appropriate packages installed and the OS configured for use. I won’t repeat the steps here; he did a great job with outlining what needs to be done. What I didn’t bother with were all of the ZFS steps he followed. I am using ZFS quite heavily on my server; in fact each jail running on it has its own ZFS volume. But the intent was to just run the VMs out of raw disk image files, so having the ZFS volumes built wouldn’t be necessary.
Instead, I created a directory in /local called bhyve, where I intended to put all of the VMs. And in the /etc/rc.conf file:
#BHyve stuff
vm_enable="YES"
vm_dir="/local/bhyve"
Then from the CLI:
vm init
and I was ready to go.
The Cumulus Disk Image
Bhyve won’t work natively with disk images from other hypervisors. Fortunately, it’s really easy to convert the images between the various hypervisor formats. I downloaded the Cumulus 3.7 KVM image from their website; that comes in QCOW2 format. It needs to be converted to a raw disk image with:
qemu-img convert -f qcow2 -O raw cumulus-image.qcow2 cumulus-image.raw
This took a bit of time; the raw file ends up being a little over 6GB in size. But fortunately, it only needs to be done once. From there, I had a base raw image that I could make lots of copies of; one for each VM. But it also means that each VM would take up a little over 6GB of disk space; something to keep in mind. My server has plenty of storage space available, so it’s not an issue for me. But, again: something to keep in mind.
Now that I had the disk image ready, I went into the /local/bhyve directory and made a series of sub-directories. When done:
joker# cd /local/bhyve/
joker# ls -l
total 56
drwxr-xr-x  2 root  wheel   5 Oct 27 13:33 .config/
drwxr-xr-x  2 root  wheel   2 Oct 26 11:19 .iso/
drwxr-xr-x  2 root  wheel  18 Oct 26 11:19 .templates/
drwxr-xr-x  2 root  wheel   8 Oct 27 12:37 agg/
drwxr-xr-x  2 root  wheel   8 Oct 27 13:17 leaf01/
drwxr-xr-x  2 root  wheel   8 Oct 27 13:17 leaf02/
drwxr-xr-x  2 root  wheel   8 Oct 27 13:17 leaf03/
drwxr-xr-x  2 root  wheel   8 Oct 27 13:36 leaf04/
drwxr-xr-x  2 root  wheel   8 Oct 27 13:05 server01/
drwxr-xr-x  2 root  wheel   9 Oct 27 13:05 server02/
drwxr-xr-x  2 root  wheel   8 Oct 27 13:05 server03/
drwxr-xr-x  2 root  wheel   8 Oct 27 12:18 spine01/
drwxr-xr-x  2 root  wheel   8 Oct 27 12:27 spine02/
The first three are created by the vm command. I created the rest of them; each directory would represent a running Cumulus image when all was said and done.
In each sub-directory, I placed a copy of the new raw disk image and named it accordingly: sub-directory/sub-directory.img. So, for instance, in the agg sub-directory, I placed a file called agg.raw.
VM Networking
Before I performed any VM networking, I needed to take care of the server’s real interface on my private network. I wanted to bridge the VMs’ eth0 mgmt interface with my server’s physical interface, so that the VMs would have access to my internal network (and DHCP server, and web server, and …). My server’s interface is a lagg of two Intel NICs: em0 and em1. It’s suggested that if you’re going to do that, you move the physical interface’s IP address to the bridge interface. So with that:
ifconfig bridge0
ifconfig bridge0 inet 192.168.10.1/24 addm lagg1
ifconfig lagg1 delete
The last line does NOT delete the lagg interface. It removes the IP configuration from it. The second line puts the IP on the bridge0 interface and adds lagg1 to it. Once these commands were done, bridge0 existed with a single lagg interface (which is actually 2 physicals) in it.
VM “Switches”
The vm-bhyve package that I installed earlier in this adventure provides a simple way to create virtual “switches” for bhyve to use. These aren’t actual vswitches in the typical sense of a hypervisor; instead they’re just bridge interfaces. Each VM that’s attached to a given switch does so through a FreeBSD tap interface. The tap interfaces sort of correspond to the interfaces on each VM. So if a VM has five different connected interfaces, it’ll have five different FreeBSD tap interfaces associated with it.
The first switch to create was the management switch. I unimaginatively called it “private” (instead of “management”… duh). Since I was going to do this manually and use the existing bridge0 interface that I already created, the command line looked like:
vm switch create -t manual -b bridge0 private
After that, I could attach VMs to the switch named “private” and they’d all have access to my internal LAN here at home.
I wasn’t done. There are a lot of point-to-point connections in my little lab. Each one would need a switch created so that the VMs could communicate with one another as if they were directly connected. For example:
vm switch create spn01-lf01
created the bridge that VMs spine01 and leaf01 would use to connect to each other. All said and done:
NAME         TYPE      IFACE           ADDRESS  PRIVATE  MTU  VLAN  PORTS
agg-spine01  standard  vm-agg-spine01  -        no       -    -     -
agg-spine02  standard  vm-agg-spine02  -        no       -    -     -
spn01-spn02  standard  vm-spn01-spn02  -        no       -    -     -
spn01-lf01   standard  vm-spn01-lf01   -        no       -    -     -
spn01-lf02   standard  vm-spn01-lf02   -        no       -    -     -
spn01-lf03   standard  vm-spn01-lf03   -        no       -    -     -
spn01-lf04   standard  vm-spn01-lf04   -        no       -    -     -
spn02-lf01   standard  vm-spn02-lf01   -        no       -    -     -
spn02-lf02   standard  vm-spn02-lf02   -        no       -    -     -
spn02-lf03   standard  vm-spn02-lf03   -        no       -    -     -
spn02-lf04   standard  vm-spn02-lf04   -        no       -    -     -
lf01-srv01   standard  vm-lf01-srv01   -        no       -    -     -
lf02-srv02   standard  vm-lf02-srv02   -        no       -    -     -
lf03-srv03   standard  vm-lf03-srv03   -        no       -    -     -
private      manual    bridge0         n/a      no       n/a  n/a   n/a
lf04-srv04   standard  vm-lf04-srv04   -        no       -    -     -
fifteen bridges created, ignoring the “private” one. You can see the third column in the table is called IFACE. That’s what references the actual bridge interface created in the host OS.
joker# ifconfig vm-spn01-lf01
vm-spn01-lf01: flags=8843<UP,BROADCAST,RUNNING,SIMPLEX,MULTICAST> metric 0 mtu 1500
	ether 4a:78:50:ca:00:e2
	nd6 options=1<PERFORMNUD>
	groups: bridge vm-switch viid-1c2d6@
	id 00:00:00:00:00:00 priority 32768 hellotime 2 fwddelay 15
	maxage 20 holdcnt 6 proto rstp maxaddr 2000 timeout 1200
	root id 00:00:00:00:00:00 priority 32768 ifcost 0 port 0
	member: tap22 flags=143<LEARNING,DISCOVER,AUTOEDGE,AUTOPTP>
	        ifmaxaddr 0 port 46 priority 128 path cost 2000000
	member: tap7 flags=143<LEARNING,DISCOVER,AUTOEDGE,AUTOPTP>
	        ifmaxaddr 0 port 31 priority 128 path cost 2000000
And here, you can see that the bridge has two tap interfaces as part of it: tap22 and tap7. I’ll get into those in a bit.
Why Use Separate Switches?
Good question. Why did I create one switch per interconnect? The answer is that I want to continue using things like BGP unnumbered in the Cumulus config as well as a few other “direct connect” technologies. If I put all of the interfaces in the same bridge, which I could have done, then those technologies would get confused and not work properly.
VM Config File
I’ll admit: this took me the longest time to get working properly. Mostly due to my own ignorance and not anything specifically wrong with bhyve or the Cumulus KVM image. Here are the important bits from the /local/bhyve/agg/agg.conf file:
cpu=1
memory=1024M
network0_type="e1000"
network0_switch="private"
network1_type="e1000"
network1_switch="private"
network2_type="e1000"
network2_switch="agg-spine01"
network3_type="e1000"
network3_switch="agg-spine02"
disk0_type="ahci-hd"
disk0_name="agg.img"
guest="linux"
loader="grub"
grub_run_partition="4"
grub_run_dir=/boot/grub
grub_run_file=grub.cfg
network0_mac="58:9c:fc:02:84:7f"
Remember from my former setup that my agg router has a management interface (eth0) and a direct uplink to the private network. I did this so that I could route into and out of the entire lab network via the agg router’s swp1 interface, not its management eth0 interface. That’s why the network0_switch and network1_switch are set to the same “private” switch; the one I created using the OS’ bridge0 interface. The rest of the VMs will only have one connection that switch except the “servers”. They won’t have a connection to it at all.
The next two interfaces, which are represented by network3 and network4 are attached to the appropriate point-to-point switches that I created previously. Hopefully that’s pretty simple to understand.
The disk0 lines tell bhyve what kind of HDD device to use, and what image file. As you can see: it’s agg.img; the one I created earlier. Each VM’s config file will reference its own respective image file, of course.
The guest type is Linux, since Cumulus is Debian Linux. And the loader… this one caused me a lot of unnecessary trouble and took the longest to figure out. Again, that’s due to my own ignorance; ultimately “grub” is the right answer. Key to making this work, though, is telling bhyve which partition the /boot directory is on. Otherwise, grub won’t load properly and the OS can’t boot. To determine this, I cheated and booted up one of my idle VBox images on my Mac. It turns out the device is /dev/sda4, or the 4th partition. Done.
Finally, you’ll see that I defined the MAC address for the first NIC. I didn’t do this at first, and instead chose to edit my static DHCP reservations. Bhyve will create new MAC addresses the first time the VM is booted. But why keep editing the DHCP reservations with each first boot when I could just re-use the MAC addresses from my VBox VMs? Duh.
Booting
The command:
vm start agg
fired the agg VM up after a lot of trial and error. And once I had the config file nailed, the OS did finally boot up. It’s a somewhat slow process the first time, but it did run. As root from the host OS, I ran this to get to the console of the VM. I tried logging in as “jvp” to see if the ZTP process was followed; unfortunately it wasn’t. So I logged in as user “cumulus”:
joker# vm console agg
Connected

Debian GNU/Linux 8 agg ttyS0

agg login: cumulus
Password:
Last login: Sat Oct 27 14:58:56 UTC 2018 on ttyS0
Linux agg 4.1.0-cl-7-amd64 #1 SMP Debian 4.1.33-1+cl3u16 (2018-09-15) x86_64

Welcome to Cumulus VX (TM)

Cumulus VX (TM) is a community supported virtual appliance designed for
experiencing, testing and prototyping Cumulus Networks' latest technology.
For any questions or technical support, visit our community site at:
http://community.cumulusnetworks.com

The registered trademark Linux (R) is used pursuant to a sublicense from LMI,
the exclusive licensee of Linus Torvalds, owner of the mark on a world-wide
basis.
cumulus@agg:~$
Did it get a DHCP address?
cumulus@agg:~$ ifconfig eth0
eth0      Link encap:Ethernet  HWaddr 58:9c:fc:02:84:7f
          inet addr:192.168.10.230  Bcast:192.168.10.255  Mask:255.255.255.0
          inet6 addr: fe80::5a9c:fcff:fe02:847f/64 Scope:Link
          UP BROADCAST RUNNING MULTICAST  MTU:1500  Metric:1
          RX packets:259290 errors:0 dropped:0 overruns:0 frame:0
          TX packets:3629 errors:0 dropped:0 overruns:0 carrier:0
          collisions:0 txqueuelen:1000
          RX bytes:72668538 (69.3 MiB)  TX bytes:733370 (716.1 KiB)
It did. And interestingly, unlike the VX images running on my Mac’s VBox, this image properly interpreted the “host-name” option line in my DHCP file. It set the hostname to agg. With that I ran the commands:
ztp -R
reboot
And a minute or two later, I had a ZTP’d VX image running on bhyve. Remember that as part of my ZTP script, I add my username and the SSH key I use on my laptop. Well, can I ssh into the “new” agg router?
deadshot$ ssh agg

Welcome to Cumulus VX (TM)

Cumulus VX (TM) is a community supported virtual appliance designed for
experiencing, testing and prototyping Cumulus Networks' latest technology.
For any questions or technical support, visit our community site at:
http://community.cumulusnetworks.com

The registered trademark Linux (R) is used pursuant to a sublicense from LMI,
the exclusive licensee of Linus Torvalds, owner of the mark on a world-wide
basis.
Last login: Sat Oct 27 16:36:49 2018 from deadshot.private.lateapex.net
jvp@agg:mgmt-vrf:~$
Success.
Remember I mentioned the tap interfaces previously? Well now that there’s a running VM, let’s ask the vm command about it:
joker# vm info agg | egrep network-interface -A 6
  network-interface
    number: 0
    emulation: e1000
    virtual-switch: private
    fixed-mac-address: 58:9c:fc:02:84:7f
    fixed-device: -
    active-device: tap0
--
  network-interface
    number: 1
    emulation: e1000
    virtual-switch: private
    fixed-mac-address: 58:9c:fc:0a:34:ae
    fixed-device: -
    active-device: tap1
--
  network-interface
    number: 2
    emulation: e1000
    virtual-switch: agg-spine01
    fixed-mac-address: 58:9c:fc:01:49:58
    fixed-device: -
    active-device: tap2
--
  network-interface
    number: 3
    emulation: e1000
    virtual-switch: agg-spine02
    fixed-mac-address: 58:9c:fc:0f:3b:ba
    fixed-device: -
    active-device: tap3
You can see from the output that each interface on the agg router has an associated tap interface assigned to it. And you can look at them from FreeBSD if you want to:
joker# ifconfig tap0
tap0: flags=8943<UP,BROADCAST,RUNNING,PROMISC,SIMPLEX,MULTICAST> metric 0 mtu 1500
	description: vmnet-agg-0-private
	options=80000<LINKSTATE>
	ether 00:bd:39:d5:9b:00
	hwaddr 00:bd:39:d5:9b:00
	inet6 fe80::2bd:39ff:fed5:9b00%tap0 prefixlen 64 tentative scopeid 0xa
	nd6 options=29<PERFORMNUD,IFDISABLED,AUTO_LINKLOCAL>
	media: Ethernet autoselect
	status: active
	groups: tap vm-port
	Opened by PID 88452
Agg Router: Static Config
Remember that originally my intent with the agg router is to mimic a router at the “top” of the data center; one that may or may not (likely not) be running Cumulus. So it has IP addresses on its downlinks to the spines, and a static 0.0.0.0/0 pointed at my internal network. I also did not write any ansible playbooks for it; instead figuring it would only take me a few minutes to configure it up again if I ever had to.
That was the next step: configuring the agg router with IP addresses, BGP, etc. All pretty easy, and all outlined in my previous blog entries.
The Servers: Static Config
My next step was to set up something that would indicate total success in this endeavor: the servers. Like my previous work, the servers (which are Cumulus with a single eth0 interface) would be statically configured. There’d be one hanging off leaf nodes 1, 2, and 3. Their address range would be 172.16.0.0/24, and VXLAN would provide their L2 broadcast domain across the leaf nodes.
Since they wouldn’t be DHCP’ing out to get an IP, I wasn’t worried about what MAC addresses bhyve would assign to them. I whipped up their respective config files, using the agg.conf as a guide. But the main difference, of course: network0_switch would be the VM’s specific bridge to its uplinked switch. So, for instance:
network0_switch=lf01-srv01
for server01’s network.
These booted right up, and required some manual config over the console. But that was fine. To each, I added:
- IP address
- Default route
- Hostname
- My “jvp” user and SSH key
And with that, I left the VMs running but ignored them.
The Spines: Ansible
I spent the entirety of the last entry discussing learning ansible and configuring the leaf nodes with it. I didn’t do anything with the spine nodes. I knew going into it that some stuff would need to be added to my inventory file, and I might need to write a couple of different “roles” for the interface and BGP configurations respectively. They’d be a bit different than the leaf nodes.
In the cumulus directory of my laptop:
mkdir -p roles/spine-bgp/tasks
mkdir -p roles/spine-interfaces/tasks
I changed the hosts inventory file to look like this; note the new variable at the end of each spine line:
[spine]
spine01 lo0=10.100.0.1	hostname=spine01	vl100=172.16.0.2	swp1=10.0.3.1
spine02 lo0=10.100.0.2	hostname=spine02	vl100=172.16.0.3	swp1=10.0.3.3

[leaf]
leaf01 lo0=10.100.0.3	hostname=leaf01		vl100=172.16.0.4
leaf02 lo0=10.100.0.4	hostname=leaf02		vl100=172.16.0.5
leaf03 lo0=10.100.0.5	hostname=leaf03		vl100=172.16.0.6
leaf04 lo0=10.100.0.6	hostname=leaf04		vl100=172.16.0.7
The reason: remember that the uplink router for the spines isn’t acting like a cumulus device, and therefore I can’t guarantee the whole BGP unnumbered bit is even present. In other words: interface swp1 on both spines would need a static IP.
The setup.yaml file was edited for the spines, with a whole new -hosts: section:
- hosts: leaf
  become: true
  roles:
  - loopback
  - interfaces
  - routing
  - bgp
  - mgmt

- hosts: spine
  become: true
  roles:
  - loopback
  - spine-interfaces
  - routing
  - spine-bgp
  - mgmt
As you can see, where it differs from the leaf entry is the call to spine-interfaces and spine-bgp. Let’s look at those files.
The spine-interfaces File
---
  - name: Configure swp interfaces
    nclu:
      commands:
      - add interface swp1-6
      - add interface swp1 ip address {{ swp1 }}/31
      - add vxlan vni10100 vxlan id 10100
      - add bridge bridge ports vni10100
      - add bridge bridge vids 100
      - add bridge bridge vlan-aware
      - add interface swp2-6 mtu 9216
      - add vlan 100 ip address {{ vl100  }}/24
      - add vlan 100 vlan-id 100
      - add vlan 100 vlan-raw-device bridge
      - add vxlan vni10100 mtu 9000
      - add vxlan vni10100 vxlan local-tunnelip {{ lo0 }}
      - add vxlan vni10100 bridge access 100
      - add vxlan vni10100 bridge arp-nd-suppress on
      - add vxlan vni10100 bridge learning off
      atomic: true
Fairly similar to the leaf nodes’ interface file, except it’s setting configs for interfaces swp1-6. The first interface gets a static IP noted by the {{ swp1 }} variable. The MTUs on interfaces swp2-6 are set to 9216 and I’m not adding an access port like I am on the leaf nodes. Finally, the VLAN100 interface doesn’t need an Anycast IP for the servers to use as a default route; they’ll be using thelr locally-attached leaf switch for that instead. I just have an IP on the VLAN100 interface so that the spines can perform VXLAN routing to get packets to the servers more efficiently.
The spine-bgp File
---
  - name: BGP with EVPN
    nclu:
      commands:
      - add bgp autonomous-system 65200
      - add bgp router-id {{ lo0 }}
      - add bgp bestpath as-path multipath-relax
      - add bgp neighbor leaf peer-group
      - add bgp neighbor leaf remote-as external
      - add bgp neighbor leaf bfd
      - add bgp neighbor swp1 interface
      - add bgp neighbor swp1 remote-as external
      - add bgp neighbor swp1 capability extended-nexthop
      - add bgp neighbor swp1 bfd
      - add bgp neighbor swp2 interface
      - add bgp neighbor swp2 remote-as internal
      - add bgp neighbor swp2 next-hop-self
      - add bgp neighbor swp2 bfd
      - add bgp neighbor swp3 interface peer-group leaf
      - add bgp neighbor swp4 interface peer-group leaf
      - add bgp neighbor swp5 interface peer-group leaf
      - add bgp neighbor swp6 interface peer-group leaf
      - add bgp ipv4 unicast redistribute connected
      - add bgp l2vpn evpn  neighbor leaf activate
      - add bgp l2vpn evpn neighbor swp2 activate
      - add bgp l2vpn evpn  advertise-all-vni
      atomic: true

  - name: reload FRR
    service:
        name: frr
        state: restarted
Again, a bit different from the leaf nodes. In this case I needed to create the leaf peer-group, set up the uplink peer and the cross-connect peer, then use the peer-group with interfaces swp3-6. What I didn’t need to do is add the leaf node’s “allow ASN in” line for EVPN since the spines wouldn’t be announcing locally-known MAC addresses in EVPN.
Executing Ansible on Spines
From my laptop, the command:
ansible-playbook setup.yaml -i hosts -l spine -K
prompted me for my sudo password, and then quickly configured the two spines. I wish I’d saved the output from the command; unfortunately I didn’t think to. But suffice to say: it worked. I had two running spines in almost no time flat. No manual configuration required at all.
The Leaf Nodes: Ansible
There’s no need to go through the details of the ansible configuration for the leaf nodes. From my previous blog entry, we know it already works. With the lead nodes booted and already ZTP’d, this command:
ansible-playbook setup.yaml -i hosts -l leaf -K
did the deed.
Checking The Work
I was almost tempted to just blindly try and ssh into one of the servers to see if it worked, but I wanted to make sure the leaf nodes and spines were talking to each other. This was pretty easy to verify:
root@spine01:mgmt-vrf:/home/jvp# net show bgp sum

show bgp ipv4 unicast summary
=============================
BGP router identifier 10.100.0.1, local AS number 65200 vrf-id 0
BGP table version 48
RIB entries 21, using 3192 bytes of memory
Peers 6, using 116 KiB of memory
Peer groups 1, using 64 bytes of memory

Neighbor        V         AS MsgRcvd MsgSent   TblVer  InQ OutQ  Up/Down State/PfxRcd
leaf01(swp3)    4      65201   30997   31033        0    0    0 1d01h47m            2
leaf02(swp4)    4      65201   31003   31033        0    0    0 1d01h47m            2
leaf03(swp5)    4      65201   31003   31033        0    0    0 1d01h47m            2
leaf04(swp6)    4      65201   29814   29826        0    0    0 23:46:40            2
agg(swp1)       4      65210   32223   32211        0    0    0 00:11:20            5
spine02(swp2)   4      65200   31373   31420        0    0    0 1d02h07m           10

Total number of neighbors 6


show bgp ipv6 unicast summary
=============================
% No BGP neighbors found


show bgp l2vpn evpn summary
===========================
BGP router identifier 10.100.0.1, local AS number 65200 vrf-id 0
BGP table version 0
RIB entries 11, using 1672 bytes of memory
Peers 6, using 116 KiB of memory
Peer groups 1, using 64 bytes of memory

Neighbor        V         AS MsgRcvd MsgSent   TblVer  InQ OutQ  Up/Down State/PfxRcd
leaf01(swp3)    4      65201   30997   31034        0    0    0 1d01h47m            4
leaf02(swp4)    4      65201   31003   31033        0    0    0 1d01h47m            4
leaf03(swp5)    4      65201   31003   31033        0    0    0 1d01h47m            4
leaf04(swp6)    4      65201   29814   29826        0    0    0 23:46:40            1
spine02(swp2)   4      65200   31373   31420        0    0    0 1d02h07m           14

Total number of neighbors 5
Looks like it. Well, let’s SSH into one of the servers from my laptop and see if it actually worked:
deadshot$ ssh 172.16.0.102

Welcome to Cumulus VX (TM)

Cumulus VX (TM) is a community supported virtual appliance designed for
experiencing, testing and prototyping Cumulus Networks' latest technology.
For any questions or technical support, visit our community site at:
http://community.cumulusnetworks.com

The registered trademark Linux (R) is used pursuant to a sublicense from LMI,
the exclusive licensee of Linus Torvalds, owner of the mark on a world-wide
basis.
Last login: Sun Oct 28 15:37:50 2018 from 192.168.10.4
jvp@server02:~$
That’s certainly promising. I already know the answer, but let’s make sure we have L2 between the servers:
jvp@server02:~$ ping 172.16.0.101
PING 172.16.0.101 (172.16.0.101) 56(84) bytes of data.
64 bytes from 172.16.0.101: icmp_seq=1 ttl=64 time=7.04 ms
64 bytes from 172.16.0.101: icmp_seq=2 ttl=64 time=3.40 ms
64 bytes from 172.16.0.101: icmp_seq=3 ttl=64 time=2.65 ms
^C
--- 172.16.0.101 ping statistics ---
3 packets transmitted, 3 received, 0% packet loss, time 2004ms
rtt min/avg/max/mdev = 2.656/4.369/7.047/1.918 ms
jvp@server02:~$ arp -an 172.16.0.101
? (172.16.0.101) at 58:9c:fc:00:5e:43 [ether] on eth0
Boom. Done.
A Note About LLDP
LLDP won’t work properly between the VMs with this setup. The FreeBSD bridge interfaces that the VMs are using as “virtual cables” will just eat the LLDP packets that each switch sends out. The pair switch won’t ever see them, so no LLDP:
root@spine01:mgmt-vrf:/home/jvp# net show int
State  Name      Spd  MTU    Mode           LLDP  Summary
-----  --------  ---  -----  -------------  ----  ---------------------------
UP     lo        N/A  65536  Loopback             IP: 127.0.0.1/8
       lo                                         IP: 10.100.0.1/32
       lo                                         IP: ::1/128
UP     eth0      1G   1500   Mgmt                 Master: mgmt(UP)
       eth0                                       IP: 192.168.10.231/24(DHCP)
UP     swp1      1G   1500   Interface/L3         IP: 10.0.3.1/31
UP     swp2      1G   9216   NotConfigured
UP     swp3      1G   9216   NotConfigured
UP     swp4      1G   9216   NotConfigured
UP     swp5      1G   9216   NotConfigured
UP     swp6      1G   9216   NotConfigured
UP     bridge    N/A  9000   Bridge/L2
UP     mgmt      N/A  65536  Interface/L3         IP: 127.0.0.1/8
UP     vlan100   N/A  9000   Interface/L3         IP: 172.16.0.2/24
UP     vni10100  N/A  9000   Access/L2            Master: bridge(UP)
You’ll see the “LLDP” column is completely blank. At this time, and with FreeBSD as the host OS, I don’t know any way around this. There may not be, unfortunately. But, for my lab use, this isn’t a deal breaker. Slightly annoying, yes. But not bhyve’s fault; more a fault with how FreeBSD handles bridge interfaces.
Summary
My goal with this exercise was to move my 10-node “lab” from my Macbook Pro laptop over to my FreeBSD server. The server has significantly more resources available to it and doesn’t overheat or page-fault itself into oblivion when the VMs are running, unlike my Mac. This all required me to learn about the bhyve hypervisor and deploying Linux images to it. Fortunately, it’s not difficult at all once you realize how to edit the config files. And since I did all that work with ansible in my previous blog entry, re-deploying these virtual devices was a matter of a reboot and running a command.
Easy peazy.
NAME      DATASTORE  LOADER  CPU  MEMORY  VNC  AUTOSTART  STATE
agg       default    grub    1    1024M   -    Yes [1]    Running (88452)
leaf01    default    grub    1    1024M   -    No         Running (93524)
leaf02    default    grub    1    1024M   -    No         Running (93604)
leaf03    default    grub    1    1024M   -    No         Running (93648)
leaf04    default    grub    1    1024M   -    No         Running (96064)
server01  default    grub    1    1024M   -    No         Running (20715)
server02  default    grub    1    1024M   -    No         Running (12516)
server03  default    grub    1    1024M   -    No         Running (21741)
spine01   default    grub    1    1024M   -    No         Running (85241)
spine02   default    grub    1    1024M   -    No         Running (86359)