
[toc]
Introduction
In the last few of my blog entries, I discussed setting up a virtual lab using Cumulus’ VX image for VirtualBox. I then went through and got EVPN working, and finally showed how using VXLAN, we can consider dumping MPLS for L2VPNs. This entry will focus on automating the bring-up of a new switch running Cumulus, and it’ll use the same lab I’ve already configured. The key technologies I’ll be working with are Ansible, along with Cumulus’ ZTP functionality.
A Note About Ansible and Me
If you’re at all experienced using Ansible, a lot of what you read here may cause you to react with something along the lines of, “Well, duh Jason. Of course that’s how it works!” That’s OK. A week ago or so, I attended an Ansible webinar put on by them and Cumulus, and it piqued my interest. Prior to this little lab experiment, I’ve done literally nothing with Ansible. I learned what I know over the course of one day. So bear with me.
The Network
After the MPLS entries, I went back through and reset the network to the way it was at the end of my EVPN entry. After that, I did some VM editing and additions. Here’s what the new network looks like; reminder that it’s all virtual running within VirtualBox:
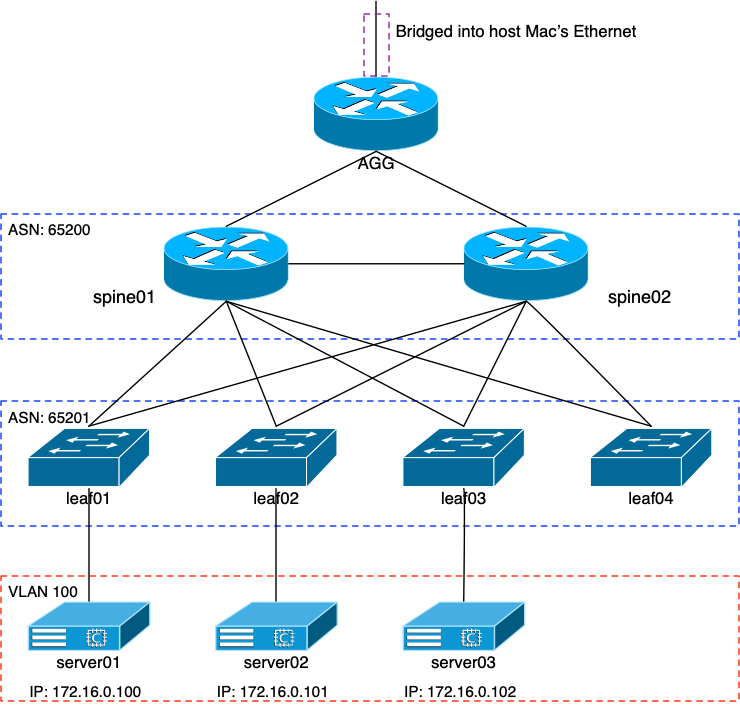
I went ahead and renamed the routers to spine01 and spine02. The leaves were renamed to leaf01 and leaf02, and then I added two more leaves. Finally, my servers were renamed to server01 and 02, with an 03 added to the mix.
Editing the VMs with VBoxManage
You’ll note that the spines now have six active interfaces. You’ll actually see in a moment that there’s a seventh. But from my original entry, we know that VirtualBox’s GUI doesn’t let us configure more than four NICs. How’d I do that? Well I know that VirtualBox supports eight NICs per VM. But for whatever reason, they decided only allow access to four of them in the GUI. Fortunately, there’s a command line utility that comes with VirtualBox called VBoxManage.
The default NIC to Cumulus interface mapping looks like this:
- NIC1 –> swp4
- NIC2 –> swp5
- NIC3 –> swp6
- NIC4 –> swp7
- NIC5 –> eth0
- NIC6 –> swp1
- NIC7 –> swp2
- NIC8 –> swp3
It’s a little strange the way the numbering works, and there’s a Cumulus-provided way to renumber them. But for the purposes of my lab, I didn’t worry too much about it. I can make this work.
Using Eth0 for Management
The first thing I wanted to do for all of the VMs is get access to interface eth0. On the network devices, this would let me create a fake management network. And for the three images that I’m using as Linux servers (remember that they’re actually Cumulus OS, with no extra interfaces configured), I could use eth0 and get rid of the swp interfaces.
VBoxManage modifyvm spine01 --nic5 bridged
VBoxManage modifyvm spine01 --bridgeadapter5 "en0"
I performed those two commands for each of the network VMs. What this did was turn the VM’s eth0 into a bridged interface and attached it to my Mac laptop’s en0 interface. The result is that each VM would have access to my home’s internal private network. Since the default interface configuration for those eth0 interfaces looks like this in /etc/network/interfaces:
# The primary network interface
auto eth0
iface eth0 inet dhcp
I knew that when the VM booted, it would DHCP out and get an IP from my router. And to make sure I always knew what the IPs were of the devices, I used VBoxManage to grab their MAC addresses. I then went into my router’s DHCP config file and set up static DHCP reservations for them. For example, the DHCP entry for my spine01 router looks like this:
host spine01 {
        hardware ethernet 08:00:27:dd:54:e6;
        fixed-address 192.168.10.231;
}
The mgmt VRF
The simple NCLU command:
net add vrf mgmt
net commit
automatically adds the mgmt VRF and stuffs the eth0 interface into it without asking you. It does prompt you that any open IP sessions over that interface will be lost as soon as the commit is run. And sure enough: an open SSH connection is killed. But that’s expected when moving interfaces between VRFs. The important part about doing this is that I didn’t want eth0’s learned default route from DHCP added to the device’s FIB. And when left in the default VRF, that’s exactly what happened. But creating the Cumulus-reserved mgmt VRF solved that.
And really, it’s the right thing to do anyway. But as you’ll see, the DHCP work and this mgmt VRF are going to come together later. It’s almost like I wrote the entry in a certain way on purpose…
The Other SWP Interfaces
The other swp interfaces needed to be attached to internal networks, not bridge networks. For instance, on both spines I decided to have interface swp2 be the cross connect between the routers. But remember that I can’t configure that interface from the GUI. Well from my Mac:
VBoxManage modifyvm spine01 --nic7 intnet
VBoxManage modifyvm spine01 --intnet7 "intnet-spine01-spine02"
VBoxManage modifyvm spine02 --nic7 intnet
VBoxManage modifyvm spine02 --intnet7 "intnet-spine01-spine02"
What I did there was tell VirtualBox that NIC7 on both VMs were connected to the same internal network (intnet) called “intnet-spine01-spine02”. It’s the same thing the GUI does, but just from the CLI. Now both spine01 and spine02 share a common cross connect between their respective swp2 interfaces.
root@spine01:/home/jvp# net show int swp2
    Name  MAC                Speed  MTU   Mode
--  ----  -----------------  -----  ----  -------------
UP  swp2  08:00:27:07:cc:17  1G     9216  NotConfigured

cl-netstat counters
-------------------
 RX_OK  RX_ERR  RX_DRP  RX_OVR   TX_OK  TX_ERR  TX_DRP  TX_OVR
------  ------  ------  ------  ------  ------  ------  ------
156972       0       0       0  156682       0       0       0

LLDP Details
------------
LocalPort  RemotePort(RemoteHost)
---------  ----------------------
swp2       swp2(spine02)

Routing
-------
  Interface swp2 is up, line protocol is up
  Link ups:       0    last: (never)
  Link downs:     0    last: (never)
  PTM status: disabled
  vrf: default
  index 4 metric 0 mtu 9216 speed 1000
  flags: <UP,BROADCAST,RUNNING,MULTICAST>
  Type: Ethernet
  HWaddr: 08:00:27:07:cc:17
  inet6 fe80::a00:27ff:fe07:cc17/64
  Interface Type Other
  ND advertised reachable time is 0 milliseconds
  ND advertised retransmit interval is 0 milliseconds
  ND router advertisements sent: 3530 rcvd: 3529
  ND router advertisements are sent every 10 seconds
  ND router advertisements lifetime tracks ra-interval
  ND router advertisement default router preference is medium
  Hosts use stateless autoconfig for addresses.
  Neighbor address(s):
  inet6 fe80::a00:27ff:fe88:18ce/128
The Challenge: Leaf03 and Leaf04
The goal of my little internal challenge was to first be able to bring up 2 new leaf nodes without manually configuring them. Rather I wanted to use ansible to do the deed. And I’d know whether or not I succeeded because server03 was pre-configured with its IP address and default route. If I could get to it and see its ARP entry on other leaf nodes, I’d know the leaf build was successful. Let’s get into ansible.
Ansible and NCLU
I’m not going to spend any time trying to teach ansible. There are lots of resources on the Internet that can do a much better job than I can. Specially since I’m just learning this myself. Instead, I’m going to use this section to explain my thought processes and how I crafted the playbooks to bring a switch up and online.
To make this a lot easier on myself, I decided that each of my leaf switches would be as identical as possible:
- Interface eth0 would be put in the mgmt VRF, and a specific 0.0.0.0/0 route added to that VRF.
- My “jvp” user and SSH key added; user would also be part of “sudo” GID.
- Interfaces swp1 and swp2 would be unnumbered
- Interface swp3 would be an access port in VLAN 100
- BGP ASN 65201
- BGP “spine” peer group applied to swp1 and swp2
- EVPN control plane for VXLAN
What we’ll see as we dig into this is: the first bullet would push me to another technology because of the way Cumulus responds when the eth0 interface is put into a different VRF (as mentioned earlier). Ansible really won’t be the right solution for it.
NCLU Commands
At this point, I had two running leaf switches that I could base my new configs off of. If you followed my previous entries, you’ll remember that I did a combination of “net add …” commands from the CLI, as well as direct editing of the interfaces and frr.conf files. Ansible will certainly allow for direct editing of those files, but it’s not necessary in about 99% of the cases. The NCLU module included with most ansible distributions will allow you to run the same “net …” commands instead of editing files.
I needed to get those commands, though. Fortunately, that’s pretty easy on Cumulus. I logged into leaf01 and ran the following command from the UNIX CLI:
net show config commands
This barfed out a long list of “net add….” commands that would recreate leaf01, with a notable exception that I’ll get into later. But for the most part, I had my list of commands needed to bring up a new switch, after replacing certain IP addresses, hostnames, and whatnot.
The Inventory File
I created a new directory called, unimaginatively enough: cumulus. In it, I added a file called hosts. The final form is shown below:
[spine]
spine01 lo0=10.100.0.1	hostname=spine01
spine02 lo0=10.100.0.2	hostname=spine02

[leaf]
leaf01 lo0=10.100.0.3	hostname=leaf01		vl100=172.16.0.2
leaf02 lo0=10.100.0.4	hostname=leaf02		vl100=172.16.0.3
leaf03 lo0=10.100.0.5	hostname=leaf03		vl100=172.16.0.4
leaf04 lo0=10.100.0.6	hostname=leaf04		vl100=172.16.0.5
I put the spines in for potential future work with ansible. But this document will focus only on the leaf nodes. You can see four of them there, and their respective entries have more than just the IP address. I wanted to make use of variables specific to each leaf node so that ansible could configure various things properly. In this case:
- lo0: The loopback interface IP, which will also serve as the BGP router ID as well as the VXLAN ID
- hostname: Pretty self-explanatory
- vl100: The real IP address on SVI VLAN100
With these variables set, I can call upon them in the playbooks so that various things in each leaf get set accordingly. Pretty handy, actually.
Tasks
With the inventory file set up, I then created a bunch of subdirectories that would represent tasks. Starting with the roles subdirectory:
mkdir roles
and then subdirectories under that one for:
- mgmt – Setting up the management eth0 interface and VRF
- user – Creating my “jvp” user
- interfaces – Configuring the swp, VXLAN, and VLAN interfaces
- routing – Getting FRR ready to run BGP
- bgp – Configuring BGP and EVPN
mkdir -p roles/mgmt/tasks
mkdir -p roles/user/tasks
mkdir -p roles/interfaces/tasks
mkdir -p roles/routing/tasks
mkdir -p roles/bgp/tasks
I’m going to skip the first two for now and focus on interfaces, routing, and BGP. You’ll see why a bit later.
Interfaces
In the roles/interfaces/tasks directory, I started a file called main.yaml. Remember that earlier, I snagged all of the “net add…” commands I needed for my configuration? Well with the ansible NCLU module, I can plug them all back in along with the variables that I set up in the inventory file. All said and done, my YAML file looks like:
---
  - name: Configure swp interfaces
    nclu:
      commands:
      - add interface swp1-3
      - add vxlan vni10100 vxlan id 10100
      - add bridge bridge ports swp3,vni10100
      - add bridge bridge vids 100
      - add bridge bridge vlan-aware
      - add interface swp1-2 mtu 9216
      - add vlan 100 ip address {{ vl100  }}/24
      - add vlan 100 ip address-virtual 44:39:39:FF:40:94 172.16.0.1/24
      - add vlan 100 vlan-id 100
      - add vlan 100 vlan-raw-device bridge
      - add vxlan vni10100 mtu 9000
      - add vxlan vni10100 vxlan local-tunnelip {{ lo0 }}
      - add interface swp3 bridge access 100
      - add vxlan vni10100 bridge access 100
      - add vxlan vni10100 bridge arp-nd-suppress on
      - add vxlan vni10100 bridge learning off
      atomic: true
I’m not going to go through each of the lines because I did most of that in my previous entry. The basic idea, though, is to set up swp1-3, change swp1 and 2’s MTU to 9216, add the VLAN information for VLAN100, and get the VNI set up for VXLAN. You can see that I’m using the variables lo0 and vl100 here. They’re utilized with the brackets, eg: {{ lo0 }}.
Routing
The routing task list is a bit different and doesn’t use the NCLU module at all. The /etc/frr/daemons file needs to be edited by hand (or automated) before FRR will do any routing at all. Fortunately, ansible has the lineinfile module that makes file editing very simple. The main.yaml file for routing looks like:
---
    - name: enable Zebra
      lineinfile:
          path: /etc/frr/daemons
          regexp: '^zebra='
          line: 'zebra=yes'

    - name: enable BGP
      lineinfile:
          path: /etc/frr/daemons
          regexp: '^bgpd='
          line: 'bgpd=yes'
Basically: go in and swap “zebra=” with “zebra=yes” and “bgpd=” with “bgpd=yes”. Typically when you do this on a new switch, it’s suggested that you:
service frr restart
But I plan on doing that later in the ansible setup. So that’s not in the routing playbook.
BGP
The BGP task list is, again, pretty simple: Just add a bunch of stuff for the leaf’s BGP configuration. Again: I’m not going to step through each line because most of it is either pretty self-explanatory, or already explained in my previous entry.
---
  - name: BGP with EVPN
    nclu:
      commands:
      - add bgp autonomous-system 65201
      - add bgp router-id {{ lo0 }}
      - add bgp bestpath as-path multipath-relax
      - add bgp neighbor spine peer-group
      - add bgp neighbor spine remote-as external
      - add bgp neighbor spine bfd
      - add bgp neighbor swp1 interface peer-group spine
      - add bgp neighbor swp2 interface peer-group spine
      - add bgp ipv4 unicast redistribute connected
      - add bgp ipv4 unicast neighbor spine allowas-in origin
      - add bgp l2vpn evpn  neighbor spine activate
      - add bgp l2vpn evpn  advertise-all-vni
      atomic: true

  - name: Fix EVPN
    lineinfile:
        path: /etc/frr/frr.conf
        insertbefore: 'advertise-all-vni'
        line: '  neighbor spine allowas-in origin'

  - name: reload FRR
    service:
        name: frr
        state: restarted
Again, you can see I made use of the {{ lo0 }} variable from the inventory file.
This is where I ran into a problem with the aforementioned “net show config commands” command. Specifically, the leaf’s EVPN configuration needs to look like this:
 address-family l2vpn evpn
  neighbor spine activate
  neighbor spine allowas-in origin
  advertise-all-vni
 exit-address-family
The line that allows the local ASN in is needed in my setup because each of the leaf nodes are in the same ASN: 65201. And without that line, each leaf will ignore the announcements from the other leaf nodes. However, there’s no corresponding “net add….” command that allows me to configure that line. It’s just not something Cumulus has in their OS, as of version 3.7.
That’s why I’m calling the lineinfile module again, to sledge-hammer the appropriate line into the /etc/frr/frr.conf file. And because I did that, I decided that at the end of this playbook is where I’d restart the frr service. Thus the call to the service module at the end of the file.
User
The user task list I created was done to set up my “jvp” account on the switch, add my ssh key to my home directory, and add the account to the “sudo” group. The task looks like:
---
    - name: add user jvp to passwd
      lineinfile:
           path: /etc/passwd
           line: 'jvp:x:1001:50:Jason Van Patten:/home/jvp:/bin/bash'
           create: no
    - name: add user jvp to shadow
      lineinfile:
           path: /etc/shadow
           line: '[shadow line cut]'
           create: no

    - name: create jvp home dir
      file:
          path: /home/jvp/.ssh
          state: directory
          owner: jvp
          group: staff

    - name: add authorized keys to jvp
      lineinfile:
          path: /home/jvp/.ssh/authorized_keys
          line: 'ssh-rsa [ssh key cut]'
          create: yes
          owner: jvp
          group: staff
          mode: 0600

    - name: add jvp to sudo
      shell: usermod -a -G sudo jvp
      ignore_errors: True
Basically a bunch of calls to lineinfile with a final shell command at the end to put “jvp” into the sudo group.
MGMT
The MGMT task was originally intended to put eth0 into the mgmt VRF, and then set a VRF-specific default route out towards my home router. I wanted to do that so that I could update the Cumulus OS using apt-get, among other things; the images would need Internet access for that.
---
  - name: move eth0 into mgmt VRF
    nclu:
      commands:
      - add vrf mgmt
      - add routing route 0.0.0.0/0 192.168.10.254 vrf mgmt
      atomic: true
The Play File
After writing all of the aforementioned files, I whipped up another in my cumulus directory called setup.yaml:
- hosts: leaf
  user: cumulus
  become: true
  roles:
  - user
  - loopback
  - interfaces
  - routing
  - bgp
  - mgmt
With this file, ansible will only act on the “leaf” hosts as noted in the inventory file. It’ll SSH in as user “cumulus” which is the user included with the default VX install. And it’ll become root using sudo, to run these commands. As you can see, it’ll fire off the tasks (noted by the “roles” section) in that order. The command to do that is:
ansible-playbook setup.yaml -i hosts -k -K
The -k and -K prompt the user for the SSH and sudo passwords respectively. But, there’s a problem…
The Problem with MGMT
The challenge here is the way I wrote the “mgmt” task list. Remember that it first creates the mgmt VRF, then adds a default route to it. But, when it creates that VRF, the open SSH connection is reset. And due to that, ansible balks and errors out. It requires me to run the aforementioned ansible-playbook command twice per leaf! I’m sure there’s a way to avoid that, but as of me writing this blog entry, I’ve yet to figure that out.
Fortunately there’s a better way to accomplish some of those tasks.
Zero Touch Provisioning (ZTP)
The Zero Touch Provisioning concept isn’t new, nor is it something specific to Cumulus. Most other network device manufacturers have something identical or very similar. The basic idea is: when the switch boots up for the very first time, it DHCPs out for an IP address and is told, “Hey, run this script after you get an IP address set up.” That script can do any number of things, and can generally be written in bash, python, perl, or any other interpreted language available on the switch.
One of the keys to ZTP is that it executes at the base OS level, not within the NOS’ CLI. With Cumulus, that’s no big deal since the NOS’ CLI is the base OS. But with other manufacturers (eg: Cisco and NX-OS, or Arista an EOS) it can make a difference. With those other devices, you have to remember that you’re running these things in the Linux OS that’s underneath the CLI you’re used to logging in to.
The ZTP Script
On my web server, I created a file called simply: ztp.sh:
#!/bin/bash

# CUMULUS-AUTOPROVISIONING

# Set up jvp account info
/bin/grep jvp /etc/passwd >/dev/null
if test $? != 0
then
	/bin/echo "jvp:x:1001:50:Jason Van Patten:/home/jvp:/bin/bash" >> /etc/passwd
	/bin/echo "[/etc/shadow line]" >> /etc/shadow
	/bin/mkdir -p /home/jvp/.ssh
	/bin/echo "[SSH key line]" >> /home/jvp/.ssh/authorized_keys
	/bin/chown -R jvp:staff /home/jvp
	/usr/sbin/usermod -a -G sudo jvp
fi


# Just configure the eth0 interface into the mgmt VRF
/usr/bin/net add vrf mgmt
/usr/bin/net commit

# Remove ssh from standard VRF and force it into mgmt VRF
/bin/systemctl disable ssh.service
/bin/systemctl stop ssh.service
/bin/systemctl enable ssh@mgmt.service
/bin/systemctl start ssh@mgmt.service
The script should be pretty self-explanatory, but I’ll review some of the high level bits. First, the line:
# CUMULUS-AUTOPROVISIONING
has to be in the script somewhere. Otherwise the switch won’t execute said script during the ZTP process.
The second section looks to see if “jvp” exists in /etc/passwd. A fail on that grep causes the script to add my username entry to /etc/passwd and /etc/shadow, create my home directory and a .ssh subdirectory under it, add my SSH key, and then make sure my user is part of the “sudo” group. These, by the way, were all steps I was doing in the set of user tasks in my ansible script. I figured it would be better to do it during ZTP, which would make running the ansible command a lot easier.
The next section is what adds the mgmt vrf. Again, had I tried that with ansible, it would succeed, But it would also throw an error and stop processing. So doing that in ZTP seems like the better choice.
And then finally, I’m stopping SSH from running on any interface and in any VRF, and specifically forcing it to run only in the mgmt VRF.
The DHCP Changes
Remember earlier how I’d made some changes to my DHCP server to hand out static IP addresses for the devices’ eth0 interfaces? Well it’s a good thing I did that. In order for me to get ZTP working, I’d need a couple more lines added:
option cumulus-provision-url code 239 = text;

option cumulus-provision-url "http://192.168.10.1/ztp.sh";
These lines tell the switch to snag the ztp.sh file from my web server during a ZTP boot.
Changes to the Ansible Files
With the ZTP script written, it was time to make some changes to the ansible files. In the setup.yaml file, I just removed the lines that read:
user: cumulus
- user
After the ZTP script runs, my “jvp” user will already be on the switch. And that will allow me to run all of the ansible commands as jvp versus cumulus. Which is good, since the default cumulus user password is a pain in the ass to keep typing!
In the roles/mgmt/tasks/main.yaml file, I removed the line that read:
- add vrf mgmt
since the mgmt VRF would already be created by ZTP.
ZTP Reset
ZTP only works the first time the switch boots; a file is set that tells the switch it’s already booted the first time, and to not bother trying ZTP again. However, you can reset that file and force ZTP to do its thing upon the next reboot, using the -R flag:
root@leaf03:mgmt-vrf:/home/jvp# ztp -R
Created symlink from /etc/systemd/system/multi-user.target.wants/ztp.service to /lib/systemd/system/ztp.service.
With that, perform a:
shutdown -r now
and let the switch reboot.
Results
First let’s see if I can SSH into leaf03 without typing in my password. That’ll indicate that my username was created properly, and my SSH key was put in place:
$ ssh leaf03
Last login: Wed Oct 24 16:48:26 2018
jvp@cumulus:mgmt-vrf:~$ sudo bash
sudo: unable to resolve host cumulus
[sudo] password for jvp:
root@cumulus:mgmt-vrf:/home/jvp# exit
Success. That means the ZTP script did its job.
Now let’s run the ansible-playbook command from my laptop and get this leaf node configured for “production”. I’m running it a little different than I mentioned above: specifically I’m not including the -k switch since I don’t need to be prompted for my SSH password. And I’m also aiming the script at leaf03 with the -l flag; that instead of having ansible trudge through all of the leaf hosts:
$ ansible-playbook setup.yaml -i hosts -l leaf03 -K
SUDO password:

PLAY [leaf] ********************************************************************

TASK [Gathering Facts] *********************************************************
ok: [leaf03]

TASK [loopback : setup loopback interface] *************************************
changed: [leaf03]

TASK [interfaces : Configure swp interfaces] ***********************************
changed: [leaf03]

TASK [routing : enable Zebra] **************************************************
changed: [leaf03]

TASK [routing : enable BGP] ****************************************************
changed: [leaf03]

TASK [bgp : BGP with EVPN] *****************************************************
changed: [leaf03]

TASK [bgp : Fix EVPN] **********************************************************
changed: [leaf03]

TASK [bgp : reload FRR] ********************************************************
changed: [leaf03]

TASK [mgmt : mgmt VRF default] *************************************************
changed: [leaf03]

PLAY RECAP *********************************************************************
leaf03                     : ok=9    changed=8    unreachable=0    failed=0
Looks like it changed a bunch of things with no unreachable or failed errors. Cool. Let’s check our work by making sure BGP and EVPN are running properly. We’ll know the latter if we’re seeing ARP entries for servers on other leaf nodes:
root@leaf03:mgmt-vrf:/home/jvp# net show bgp sum

show bgp ipv4 unicast summary
=============================
BGP router identifier 10.100.0.5, local AS number 65201 vrf-id 0
BGP table version 12
RIB entries 21, using 3192 bytes of memory
Peers 2, using 39 KiB of memory
Peer groups 1, using 64 bytes of memory

Neighbor        V         AS MsgRcvd MsgSent   TblVer  InQ OutQ  Up/Down State/PfxRcd
spine01(swp1)   4      65200      33      30        0    0    0 00:00:34           12
spine02(swp2)   4      65200      33      30        0    0    0 00:00:34           12

Total number of neighbors 2


show bgp ipv6 unicast summary
=============================
% No BGP neighbors found


show bgp l2vpn evpn summary
===========================
BGP router identifier 10.100.0.5, local AS number 65201 vrf-id 0
BGP table version 0
RIB entries 11, using 1672 bytes of memory
Peers 2, using 39 KiB of memory
Peer groups 1, using 64 bytes of memory

Neighbor        V         AS MsgRcvd MsgSent   TblVer  InQ OutQ  Up/Down State/PfxRcd
spine01(swp1)   4      65200      33      30        0    0    0 00:00:34           10
spine02(swp2)   4      65200      33      30        0    0    0 00:00:34           10

Total number of neighbors 2
root@leaf03:mgmt-vrf:/home/jvp# net show evpn arp-cache vni 10100
Number of ARPs (local and remote) known for this VNI: 8
IP                        Type   State    MAC               Remote VTEP
fe80::a00:27ff:fe27:77a2  local  active   08:00:27:27:77:a2
172.16.0.1                local  active   44:39:39:ff:40:94
172.16.0.4                local  active   08:00:27:27:77:a2
fe80::a00:27ff:fec0:dd60  remote active   08:00:27:c0:dd:60 10.100.0.3
172.16.0.101              remote active   08:00:27:cc:f7:76 10.100.0.4
fe80::4639:39ff:feff:4094 local  active   44:39:39:ff:40:94
172.16.0.100              remote active   08:00:27:c0:dd:60 10.100.0.3
fe80::a00:27ff:fecc:f776  remote active   08:00:27:cc:f7:76 10.100.0.4
Everything’s looking good. We have 2 EBGP peers (the spine nodes) and two EVPN peers (same spine nodes). And our EVPN ARP cache has been filled in with servers from the other nodes. As one final set of checks, we’ll log into the server that’s connected to leaf03 and check its ARP cache. One successful test right off the bat is being able to SSH into that server; it means the IP routing is working.
$ ssh 172.16.0.102
Last login: Tue Oct 23 22:08:31 2018 from 192.168.10.4
jvp@server03:~$ ping 172.16.0.100
PING 172.16.0.100 (172.16.0.100) 56(84) bytes of data.
64 bytes from 172.16.0.100: icmp_seq=1 ttl=64 time=3.65 ms
64 bytes from 172.16.0.100: icmp_seq=2 ttl=64 time=2.40 ms
64 bytes from 172.16.0.100: icmp_seq=3 ttl=64 time=2.52 ms
^C
--- 172.16.0.100 ping statistics ---
3 packets transmitted, 3 received, 0% packet loss, time 2003ms
rtt min/avg/max/mdev = 2.403/2.861/3.651/0.560 ms
jvp@server03:~$ arp -an 172.16.0.100
? (172.16.0.100) at 08:00:27:c0:dd:60 [ether] on eth0
As you can see, we can ping the server that’s connected to leaf01, and we also have its ARP info cached. That means L2 connectivity between the servers via VXLAN.
Success.
Summary
With ansible and ZTP, I was able to get a new Cumulus VX image up and running in my virtual network without manually configuring any piece of it. As stated: this was a learning process for me as I’d not used ansible prior to writing this. So it’s quite likely there are still better ways for me to accomplish what I was after. But I’m reasonably happy with how it turned out.
1 thought on “Automating Cumulus With Ansible and ZTP”