[toc]
Introduction
Over the last couple of years, I’ve written a few articles here about my adventures streaming to Twitch (and YouTube before that). Recently, I’ve made some significant changes to my hardware and software setup to handle the streaming and recording. Since I haven’t been writing and publishing a whole lot on this site in ages, I figured it might be time to restart that. And what better topic than my setup?
Before we go too much further, just a warning or two:
- This is going to be wordy, and I refuse to do “TL;DR” summaries at the end. Read. The. Article. Please.
- I overdo it when it comes to hardware. I over-engineer everything because I get a kick out of it. “If it’s worth doing, it’s worth over-doing” is a statement the Mythbusters made famous some time ago. I love that and live it. With that, please understand that if you want to replicate what I’ve done here, you’re going to be spending a fair chunk of money. You don’t HAVE to replicate it though. I’m just going to explain what I have and why I set the system up the way I did.
Goals
Previous articles here have made it clear that my streaming setup was working. So why change it? Well late last year, I decided to “get over it” and add a face cam to my Twitch streams. But, I still wanted to be able to record my game play without my ugly mug in the videos. And I wanted to make sure that when doing all of this, the recording and streaming added nearly no load to my gaming PC.
So to summarize the goals:
- Stream with a face cam
- Record without the face cam
- Place no or negligible load on my gaming PC
With those goals in mind, I moved my streaming setup to a triple-rig one. Yes, I said triple-rig, not double-rig. There’s a reason for that, and it goes along with my lunacy of over-doing things. Keep reading and I’ll explain it.
The Hardware
Let’s talk about the hardware I’m using. Remember the second bullet point in the Introduction section: I overdo things. This section may also seem like a giant advertisement for several brands. Please note that I’m not sponsored by any of them, nor have they contacted me about this, nor any such thing. I’m merely a happy customer and user of their respective goods.
Gaming Rig
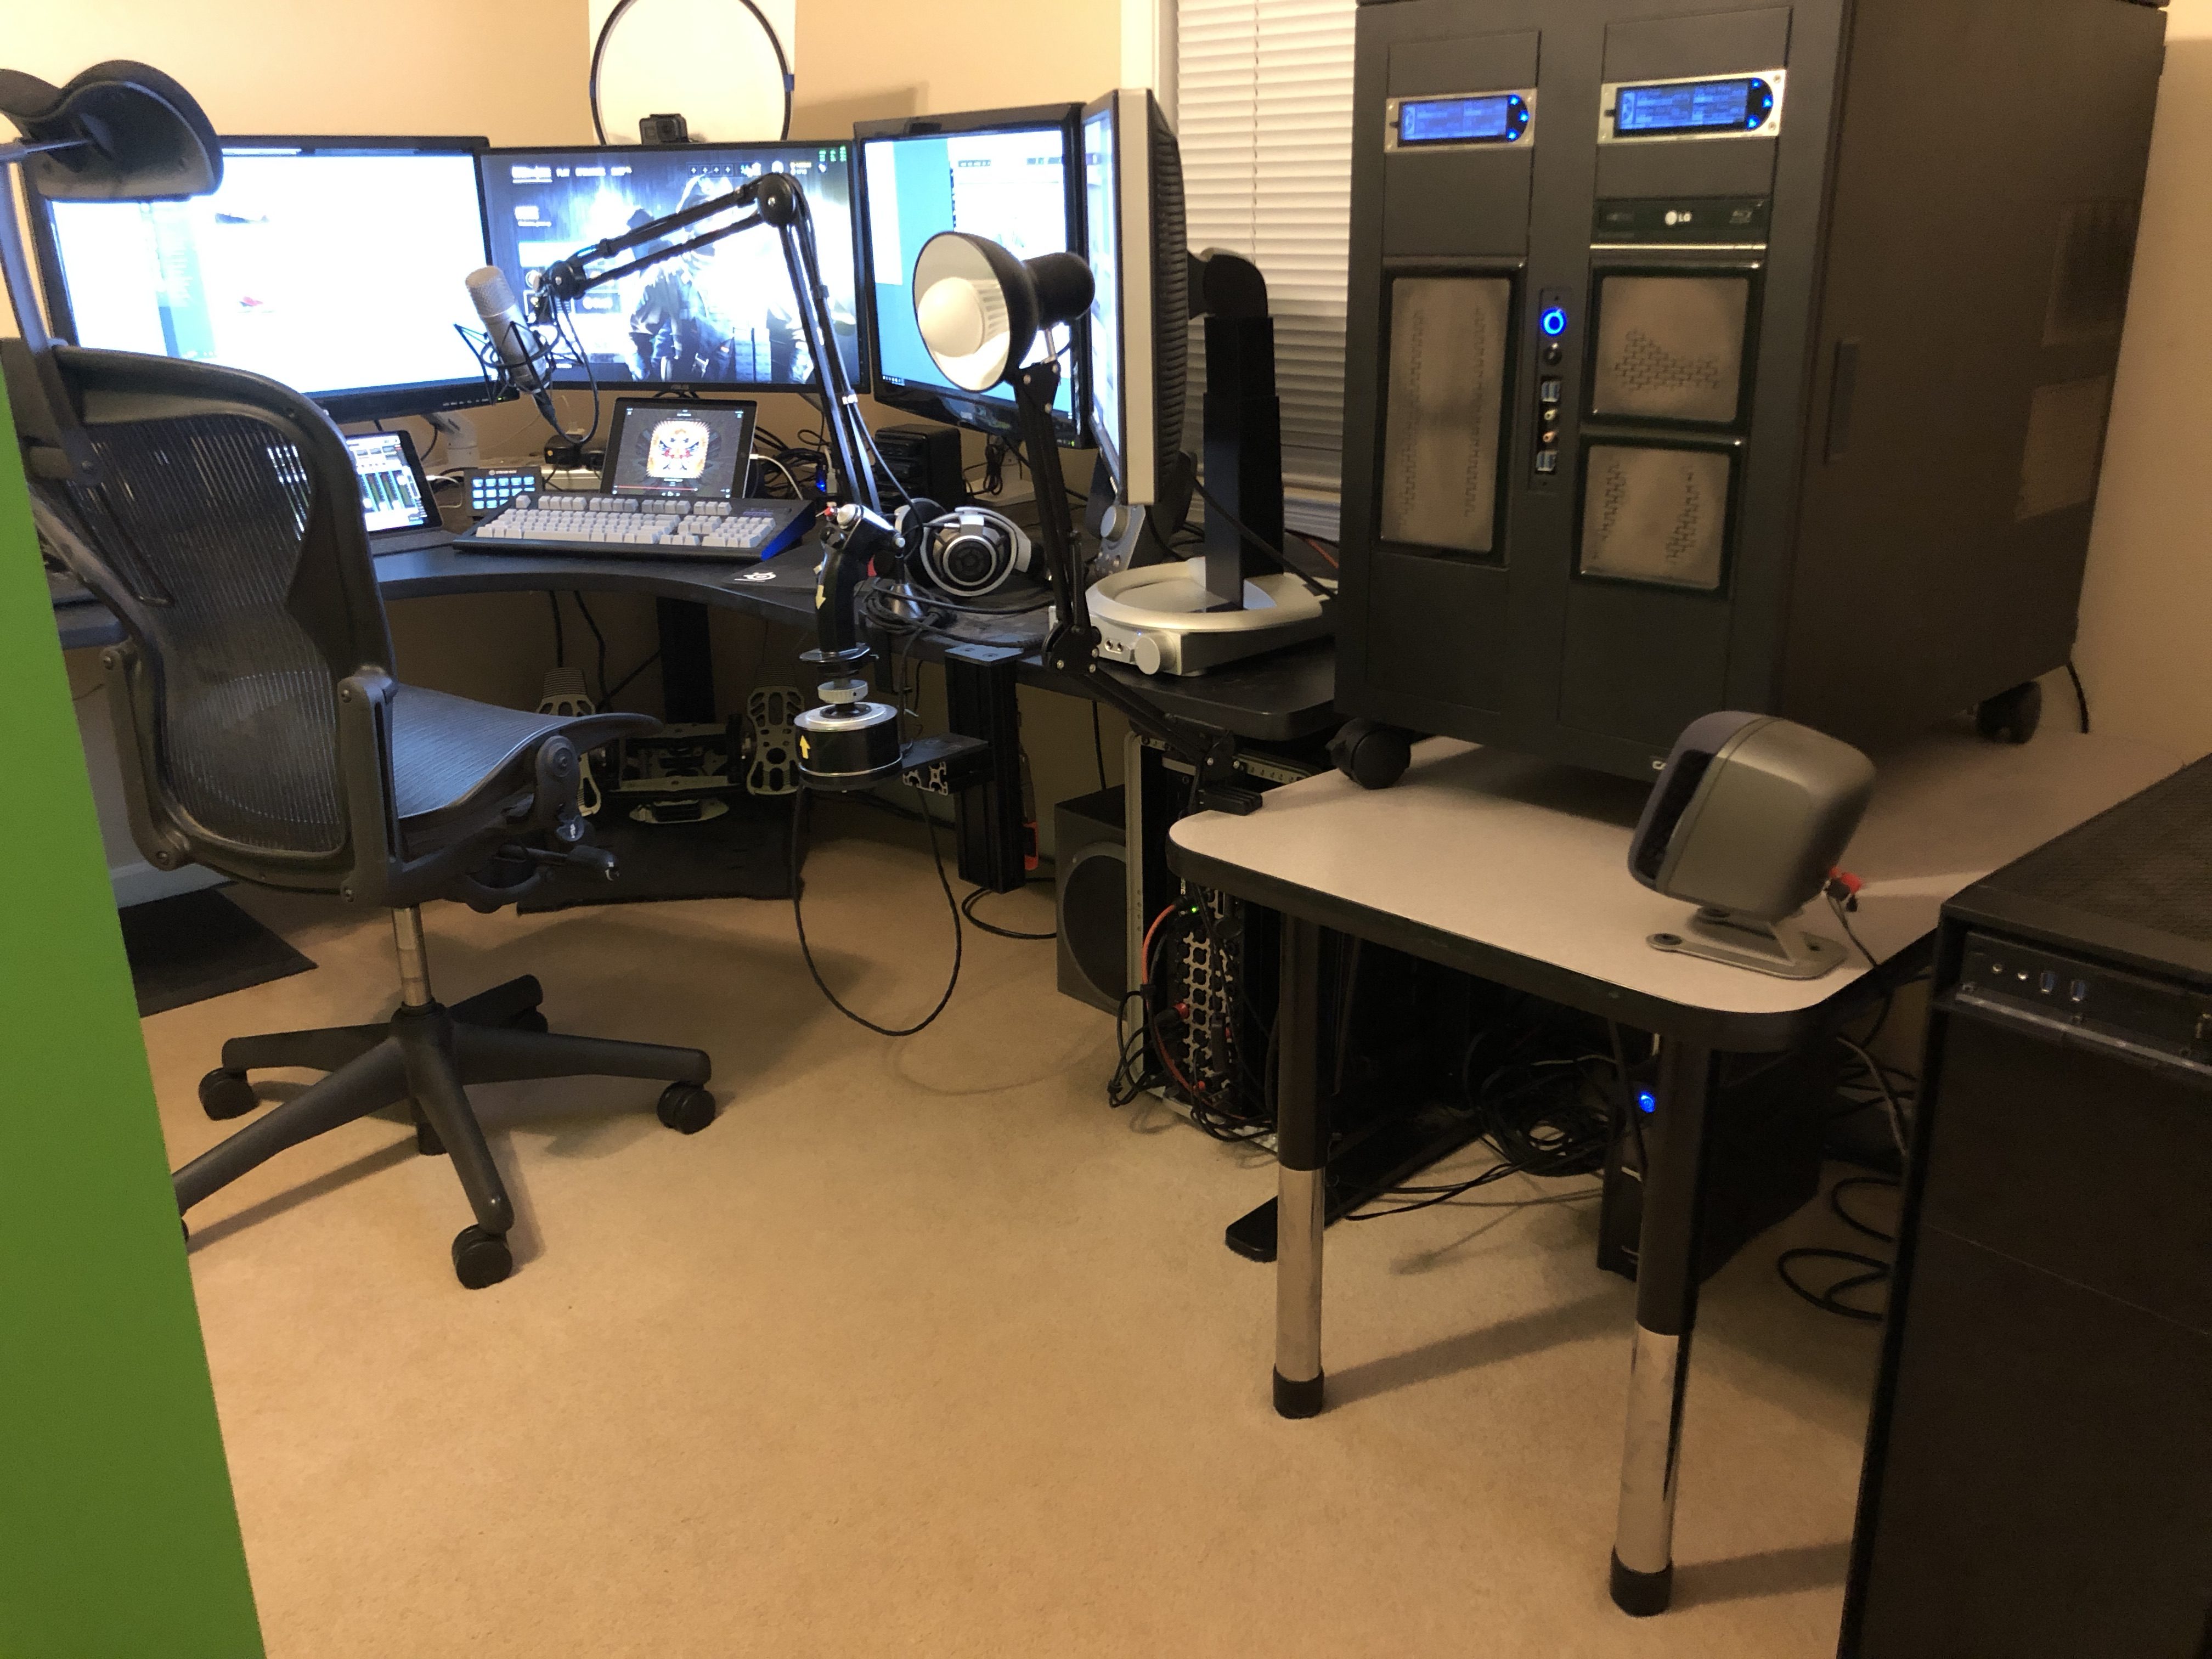
The components that make up my gaming rig, along with some of the ancillary audio and video components are listed on this page. I’m not going to go over all of the parts of the rig; rather I’m going to focus on the components that help with the streaming.
The main component on the gaming rig that’s required for streaming is: the GPU. Specifically in this case: a GPU that can mirror its primary display out an available HDMI 2.0 port. The need for that will become apparent as I dive into the Streaming Rig in the next section. Because I’m gaming at 2560×1440, 144Hz, I can’t use anything older than HDMI 2.0 for the cloned or mirrored output. That resolution and refresh rate is just too much bandwidth for older HDMI connections.
As you can see from the list of hardware on the aforementioned link, I’m using a pair of NVidia Titan X Pascal cards. And yes, they have an HDMI 2.0 port on them.
I’m not really a big fan of on-board audio. Most motherboard audio DSPs and DACs are garbage in comparison to a good, discrete sound card. But, that’s entirely up to you. In my case, I have a SoundBlaster ZxR card that’s sending its output to the Mackie DL32R mixer under my desk. It’s doing so with 2 RCA-to-XLR cables for stereo output. The same card is also receiving a stereo feed from the Mackie, via another pair of RCA-to-XLR cables.
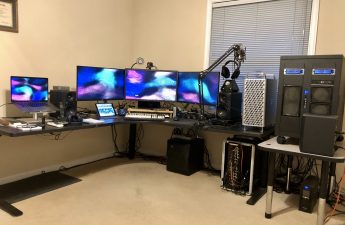
Streaming Rig
My streaming rig is far more powerful than it needs to be from a CPU perspective. The motherboard, memory, and CPU in it were re-purposed from my previous gaming rig. It’s made up of:
- Asus ROG Rampage V Extreme motherboard
- Intel 5960X CPU (water cooled)
- 64GB RAM
- NVidia GTX 1050 GPU
- Along with a re-purposed SSD, power supply, and case.
To handle streaming duty, I added some hardware from Elgato Gaming to it:
- 4K60 Pro Capture Card
- Cam Link (with a GoPro Hero 5 connected to it)
- Stream Deck
- Green Screen (as a backdrop behind me)
As mentioned: I’m not sponsored by Elgato (or anyone mentioned in this post). I’m just a very happy customer.
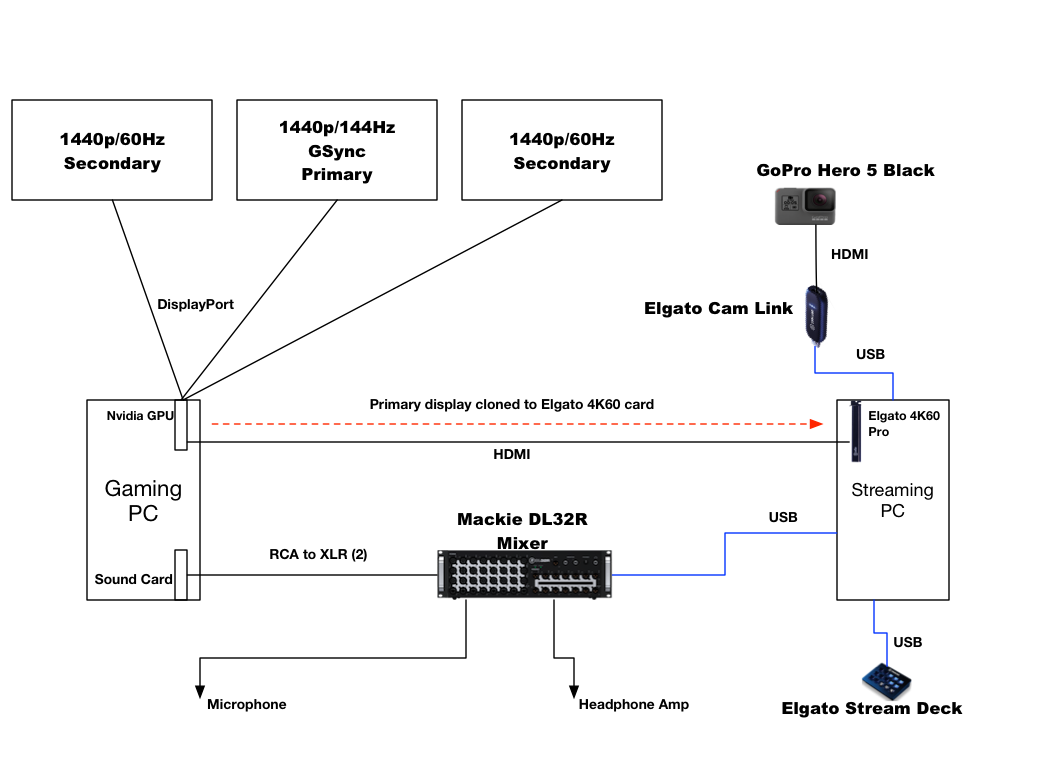
How It’s Connected Together
A picture is worth way more than any words I could craft up. So:
Server
Initially, I had planned to stream directly to Twitch from my new streaming rig. But I have this lunatic-like insistence that my 1080p/60FPS stream be sent up with the “Slow” OBS Studio preset. I figured the 5960X, which I initially had OC’d to 4.3GHz, could handle it. I was wrong. My audience kept complaining of stuttering, skipping, and lots of dropped frames. And sure enough, when I backed the stream off to “Medium”, the problems almost immediately cleared themselves.
That annoyed me. A lot.
If you’ve read my previous discussion regarding streaming to Twitch (and YouTube) using FreeBSD, you’ll recall that I have a dual Xeon server sitting in my basement. Over the last year or so, I’ve stopped streaming to both Twitch and YouTube, and just stream to Twitch now. Further, Twitch cracked open the upload bitrate for us to somewhere between 6.5Mbit/sec and 7Mbit/sec; more than enough to handle a 1080p/60FPS stream. It’s not fantastic, but it’s far better than it used to be. So with that, I made adjustments to my server to inhale a 50Mbit/sec, 1080p/60FPS NVENC stream from my gaming rig and compress it down to a 6.5Mbit/sec stream for Twitch.
And it does this using the “Slow” preset. I tried pushing it to “Slower”, but the server screamed, “Merrrrrcyyyyyyyyyyy!” It did. I heard it from the basement. So “Slow” it is.
So the server is back into the mix, and I’ll explain the configuration from a software perspective in the next sections. But suffice it to say: the server is still doing the heavy lifting here. The streaming rig is nothing more than an aggregation point for the game, face cam, audio, and alerts. And with that, I could have used a CPU 1/4 as powerful as what’s in it.
Mixing With Mackie
Before I venture into the software and configuration realm of this overly-engineered solution to a problem that didn’t exist, let me first go through the Mackie mixer. As mentioned, it’s the DL32R. By now, you’ve looked it up and your jaw has hit the floor. You’re asking me, “What in God’s name do you need an $1800 rack-mounted mixer for?!”
I don’t. I just want one. 🙂
Let me flesh that out a bit more for you without the snark. Or, well, with less snark. It is me, after all. My previous mixer was a Mackie DL806, which is one of the smaller brothers of the DL32R. It has 8 inputs and 6 outputs, and is controlled by an iPad just like the DL32R is. This worked very well for me while I was streaming with a single machine. I could feed my game sound and my comms sound out to different input channels, send a pair of outputs to my headphone amp, another pair of outputs back to the gaming rig, and a third pair of outputs to the gaming rig for the music from the iPad. All so that I could control those sound inputs and outputs independently.
Adding the second machine into the mix complicated things a bit. The second machine has a cruddy sound system built into the Asus motherboard (Realtek is Realtrash). I didn’t really want that affecting the audio quality of my stream. Further, that’s a single stereo channel IN and OUT of the streaming PC. This is somewhat limiting from an OBS Studio perspective.
My streams have multiple sound tracks or stereo channels, if you will:
- My microphone (mono->stereo)
- The game
- Comms software (eg: TeamSpeak, Discord)
- Music
- Alerts (new follows, subs, etc)
I could mix all of these (except the alerts; those would be local to the streaming rig) together on the DL806 and feed the streaming machine a single stereo channel. Then on my mixer, I could adjust each input independently using the faders on the Mackie Master Fader iPad app. But here’s where the “gotcha” comes in: what if I want to mute comms on my stream, but I want to hear them in my headphones? Like if I’m briefly talking to a buddy on Teamspeak while I’m streaming, but I don’t want the stream hearing it? I could go in and drop the faders of my mic and the comms channel on the Master Fader app, and that would work. Then I’d just have to remember where the faders were so I could return them to the same positions once I was ready to interact with my audience.
The other, and far more flexible (IMHO) choice is to have independent output channels from the mixer as independent input channels on the streaming PC. And then tell OBS Studio to latch onto those as separate Sound Inputs. With a touch of a button on the Elgato Stream Deck, I can mute the mic and comms channels in OBS, not the mixer. I can chat with my buddy or whatever while the audience listens to some music from my mixer, and then when done, unmute everything.
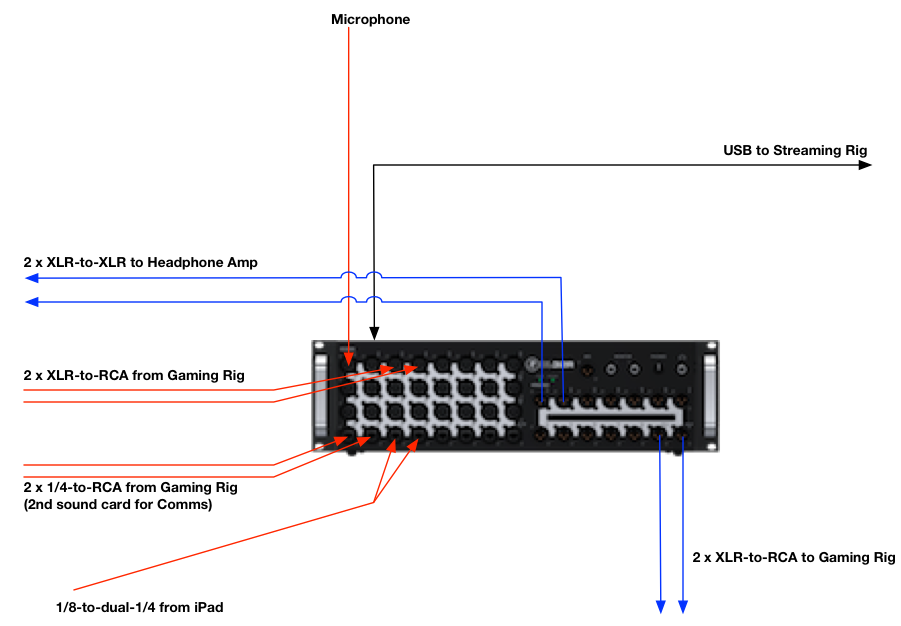
A weakness, if you will call it that, of the smaller DL806 and DL1608 mixers from Mackie is: no USB input/outputs. Mackie has decided to keep the USB interface on the big daddy, likely due to the on-board processing it has to do. But: the DL32R does have a USB port on the back of it, and when you connect to a Windows 10 PC, the PC sees 16 stereo Playback devices (sound cards, if you will) and 16 stereo Recording devices.
Using the Master Fader app’s routing capabilities, I can route physical and logical inputs and outputs across the USB connection, and in the end, they just show up as more faders (or outputs) on the app. Meaning I can configure the mixer to send 4 independent stereo channels across the USB connection for the mic, the game, the comms, and the music. On the streaming rig side, I’ve renamed the inputs and outputs to keep track of them, and disabled the channels I’m not using. But here’s what the Windows 10 Sound control panel looks like, as an example:
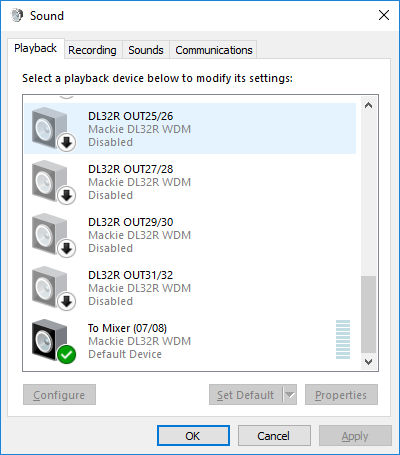
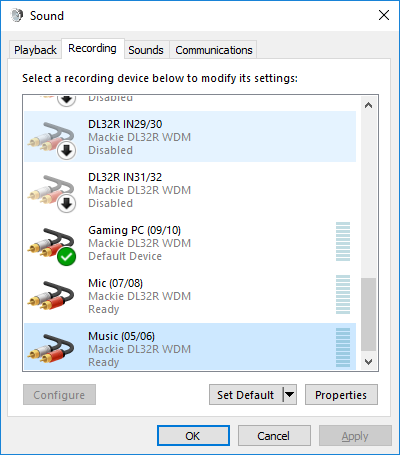
So: do I need a mixer with 32 physical inputs and 14 physical outputs? Absolutely not. I’m not even using a quarter of the physicals. But the USB connectivity and routing in the box are horrendously powerful. They offer me up a huge amount of flexibility that I wouldn’t normally have without doing some very sketchy software tricks with OBS Studio (See: NDI. It’s awful).
A Note About the Mixer
I’m sure if the folks at Mackie read this, they’d cringe. But: please don’t run right out and dump $1800 on a new mixer. PLEASE. Another “past time” of mine is helping a bunch of buddies who are in a rock and roll cover band, when they’re on stage. Specifically: with their audio. I roam the audience with my iPad in hand, and have complete control over their on-stage mixer. I have the time and knowledge to set these sorts of things up, and the ear to appreciate the difference in quality. I don’t mean this as an insult in any way, but if you don’t have those things, you’re going to be frustrated. And out $1800. So please DO NOT follow exactly in my footsteps. Rather, use this as a guide to plot your own course.
I’ll likely repeat this same message again.
Configuration
“Buying, building, and connecting all this hot hardware is great, Jason, but how the hell do you make it work?” Good question. The answer, of course, is 42.
OK, maybe Deep Thought was wrong this time. Let’s get into the two PCs and figure out what’s what here.
Gaming Rig
The primary point of configuration to make a remote capture work starts on the source, or gaming PC. As you saw in the diagram above, you have to clone the primary display with the capture card. The capture card in the streaming PC should just appear as another connected display, as far as your video card is concerned. And sure enough for me, that’s exactly what NVidia’s Control Panel shows. On the gaming rig:
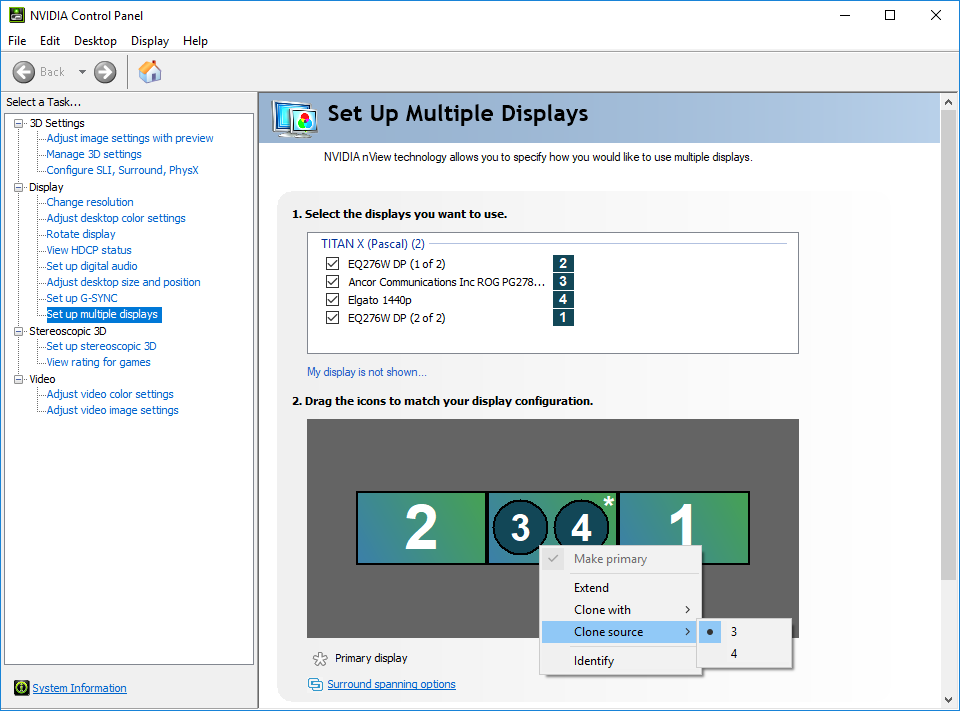
You can see that my primary 144Hz panel is display 3. The Elgato card is display 4. I have them cloned, once cloned, I told the Control Panel to set display 3 as the “source”.
Easy peasy, right? Uh. Not quite. There’s some work I had to do with the Elgato card, specifically due to the way I have it connected. The primary way to use the Elgato card is as an HDMI pass-through: you connect the HDMI output of your GPU into the capture card, and then connect your gaming display to the capture card’s HDMI output. But, I can’t do that. My primary display is an Asus PG278Q, which does 1440p at 144Hz with NVidia GSync. Ignoring the fact that the display doesn’t have an HDMI 2.0 input, the GSync is the killer. It requires DisplayPort to do its magic; HDMI just can’t handle the communication.
So with that, some work had to be done on the streaming PC to make it all “click”.
Streaming PC
Elgato asks you to install their 4K Capture Utility software when you install the 4K60 Pro card. It keeps the card up to date, and provides any Windows drivers that are needed. It also helps you configure the card locally. With that software running, I had to open the Preferences box, click on the Device tab, and set:
- Input EDID Mode: Internal
- EDID (Internal): 1440p
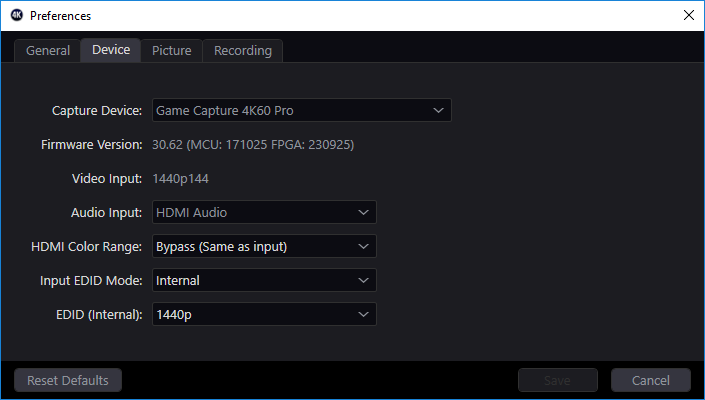
Once that was done, the device actually appeared to my gaming PC as another 1440p display, vs a 4K display. And the games started appearing properly in the capture software.
Checking The Work With OBS Studio
Did it work? Well let’s see. First we’ll fire up OBS Studio on the gaming rig and make sure it sees the game, but there’s nothing else frightening being recorded:
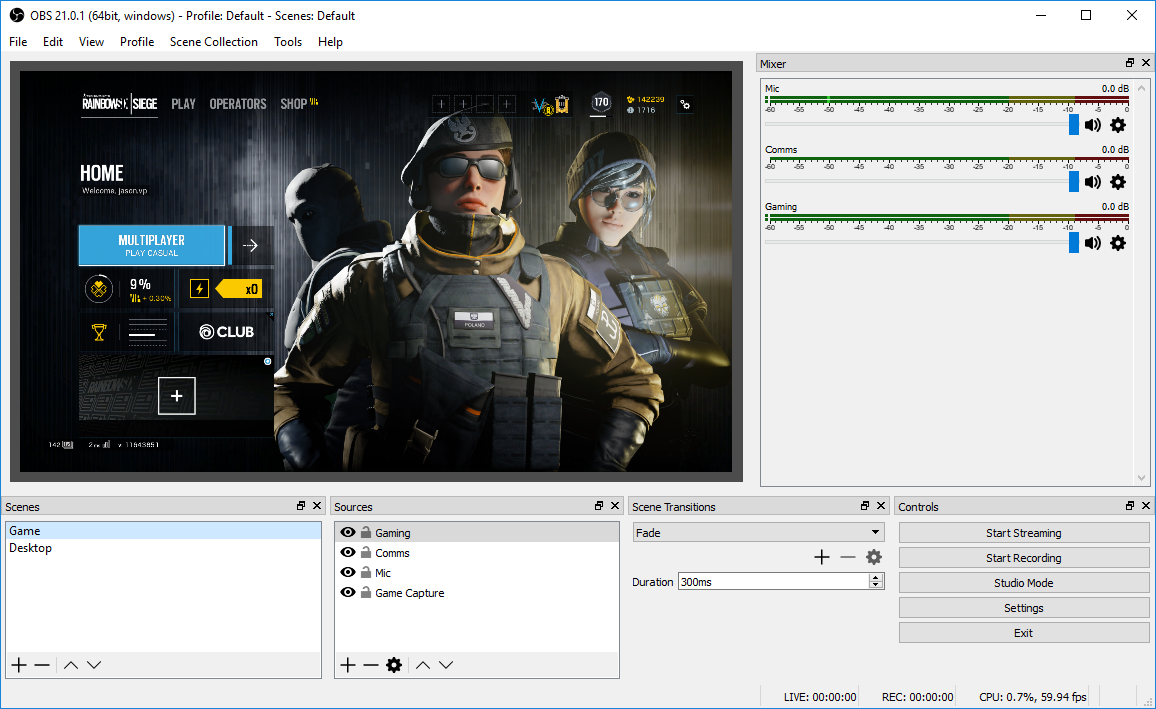
Yep, looks like it. All you can see is the game. And I can record that game play using NVENC with a silly-high bitrate of 50Mbit/sec if I want.
What about on the streaming rig?
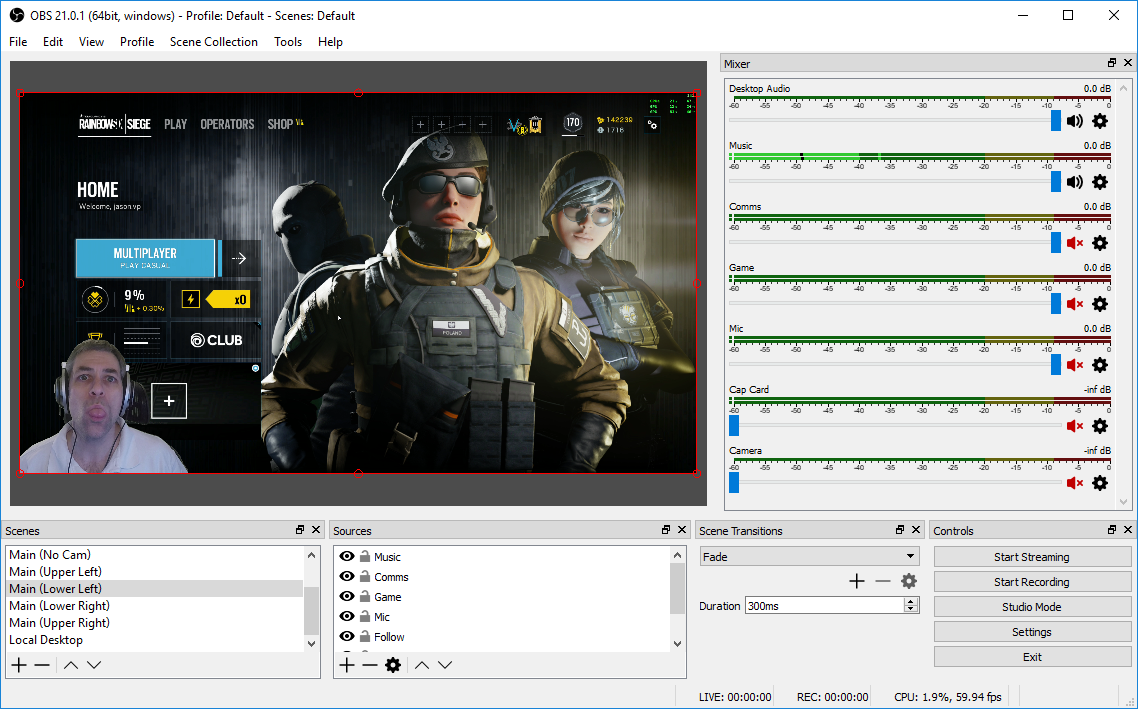
Well that’s just terrifying, and I hope it didn’t blind you.
What About Twitch?
And this is where the server comes into play. I’m not going to go over the specifics if configuring the server with NGINX and FFMPEG. I’ve done that on a previous blog entry, and even produced a YouTube video explaining it (prior to the face cam and second PC). So I’ll leave that as an exercise for the reader to figure out. But to help drive home the point with a diagram:

The streaming rig sends a 50Mbit/sec NVENC hardware stream to the server in my basement. The server captures that massive stream, compresses the snot out of it to 6.5Mbit/sec, and then transmits it to Twitch. All using the “Slow” preset.
And my streams look fantastic, if I do say so myself. All except the ugly guy in the lower left corner of it.
Summary
First: thanks for reading all the way through this text vomit. I hope there were some helpful tidbits for you, and you can use it as a guide to plan out your own streaming (and recording) adventures. Ask me any sorts of questions you might have, and I’ll try to answer them. You can register here and do it, but that’s probably a lot slower than finding me online. I manage the Discord servers for both LevelCap and JackFrags, and am on a few others. Look for “JasonVP”; that’s me.
Second: remember, treat this as a guide. Don’t treat it as a manifesto that you must follow bit by bit; you’ll spend more money than you need to and you might end up frustrated. Specially when it comes to the mixer setup. While I can answer some generic setup questions, I can’t (nor won’t) answer in-depth mixer setup questions.
Third: yes, I know this is silly and ridiculous and overdone and over-engineered and… Yep. Got it. That’s how I roll. As you were.

2 thoughts on “Twitch Streaming Setup”