[toc]
Introduction
In a previous entry I discussed the differences in streaming game play to YouTube vs Twitch, as well as the differences between using hardware versus software h.264 encoding. The conclusion that I came to was that I was going to continue streaming to my YouTube channel until I decide to buy and assemble another PC specifically for Twitch streaming. However, I don’t have to wait that long or spend that kind of money.
I Have a Server…
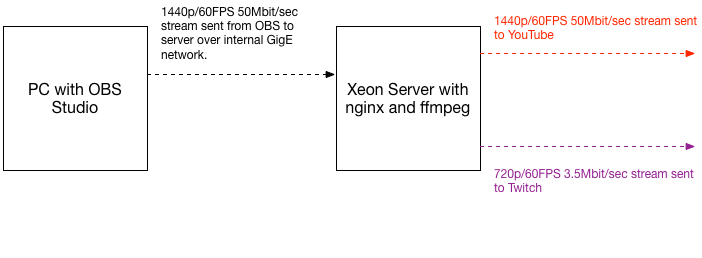
Back in December of 2015, I documented rebuilding the server I have in my basement. This server is one that I use for my web pages (like this one), my email, DNS, and various other services. With its two 8-core Xeon processors, it’s got quite a lot of grunt that goes mostly unused throughout the day. Low traffic web servers like mine take up nearly no CPU load. Low traffic DNS servers are the same. I do get a fair bit of spam, but even that doesn’t really challenge a newer Xeon. It never really dawned on my to use some of that idle grunt to send video game streams out to YouTube or Twitch. Or both.
The Kick in the Ass: TaintedGamer4k
After I wrote that previous entry regarding streaming, Jeremy, aka TaintedGamer4k contacted me via Twitter and offered up suggestions on getting nginx (pronounced “engine X”) to accept a single stream from my gaming PC (running OBS Studio) and to re-broadcast it to both YouTube and Twitch. I hadn’t even mentioned to him that I had a server, but I think he just assumed it and did so correctly. At first I shooed him away because I didn’t think it was going to work properly. But his suggestion did plant the idea in my head and after some thinking about it, I did some more research. At the conclusion of said research, I realized I needed two parts to make this work.
Nginx: The Data Mover
The first part is nginx. It’s a very simple web server that can have a bunch of modules compiled into it for other protocols. The rtmp module provides the means to both accept and send streams from the likes of OBS, and to the likes of YouTube, Twitch, etc. Since my server is FreeBSD, I decided to see if an nginx pkg was already created and it was. However, after I installed it, I realized the pkg maintainers hadn’t also included Arut’s rtmp module.
The fix for this was easy. Nginx isn’t large and doesn’t have a huge source code tree. I just snagged the latest tarball from their website, along with a git clone of the rtmp module. Once I had it all downloaded, the nginx configure line was simple:
/configure --add-module=/usr/local/src/nginx/nginx-rtmp-module
And then:
make ; make install
And voila: nginx 1.11.8 was installed with the latest rtmp module.
FFMPEG: Everyone’s Friend
Most streamers, video editors, and others that work with video have no idea how often they actually use ffmpeg. It’s what makes OBS Studio possible. It’s also at the base of Handbrake. It’s a set of applications and libraries that started life in 2000, and it’s all completely free. Here’s an incomplete list of all of the applications that make use of the work done in and with ffmpeg.
My FreeBSD server already had ffmpeg installed; if it hadn’t, all I’d need to do is:
pkg install ffmpeg
and the latest version would be installed.
Configuration
Because I’d built nginx versus installing it from a pkg, the nginx.conf file ended up in /usr/local/nginx/conf. I’ll include just the parts of the file that are necessary.
rtmp {
server {
listen 1935;
max_message 10M;
application app1 {
live on;
record off;
# FFMPEG the snot out of the stream
exec /usr/local/bin/ffmpeg -i rtmp://127.0.0.1/app1/KEY -vb 3500k -minrate 3500k -maxrate 3500k -bufsize 7000k -s 1280x720 -c:v libx264 -preset slow -r 60 -g 120 -keyint_min 120 -x264opts "keyint=120:min-keyint=120:no-scenecut" -sws_flags lanczos -tune film -pix_fmt yuv420p -c:a copy -f flv -strict normal rtmp://127.0.0.1/app2/KEY >/dev/null 2>/dev/null; # 2>>/usr/local/nginx/logs/ffmpeg.log
# Push to YouTube unaltered
push rtmp://a.rtmp.youtube.com/live2/YouTube_Key;
}
application app2 {
live on;
record off;
push rtmp://live-iad.twitch.tv/app/Twitch_Key;
}
}
}
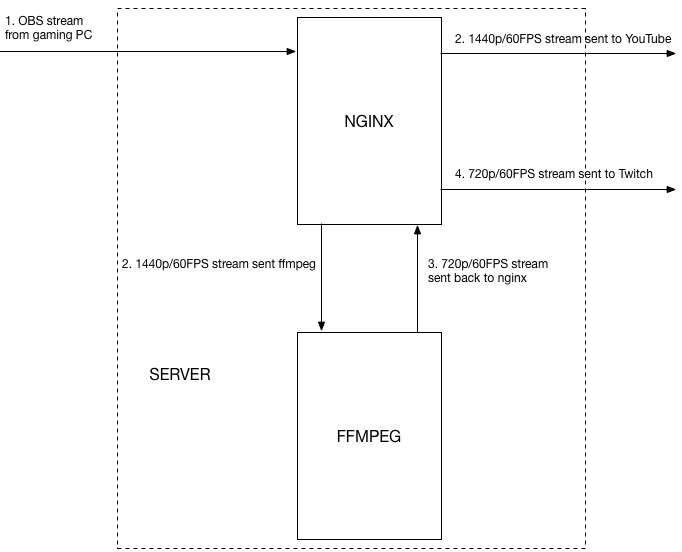
I’ll go through the configuration file in a moment, but the basic idea is this:
- Set up a stream target (application) for OBS Studio to send to. In this case it’s rtmp://server/app1/KEY.
- These happen simultaneously:
- A completely unaltered copy gets sent directly to my YouTube stream.
- ffmpeg is called to read directly from app1.
- ffmpeg scales and compresses, and outputs it back to nginx on: rtmp://server/app2/KEY.
- nginx sends the scaled/compressed stream out to my Twitch stream.
RTMP Config
The rtmp{} section of the nginx.conf file is what does all of the bit moving in this case. In fact I don’t bother having nginx’s http server running as it’s not necessary.
Server Subsection
Within the server subsection, I first list the default port. The rtmp protocol is known to use port 1935, so I set that with the listen command. Also, during the troubleshooting of setting this up, I found the a lot of “Message too large” messages in the error log. To fix that, I set the max_message command to 10M.
App1 Input Application
This is the application that takes the feed in from OBS Studio via the network. Live is set to on, and record is set to off. The ffmpeg binary is called with exec; the massive option list for ffmpeg will be explained in another section. And finally, push an untouched copy of the input stream directly to YouTube.
App2 Input Application
This is the application that ffmpeg outputs its compressed and scaled stream to. The live and record commands are set identically to app1. It then does a push of that ffmpeg output directly to my Twitch stream.
FFMPEG Arguments
The ffmpeg applications does all of the hard work. And in order for it to do that properly, it needs a massive number of arguments. I’ll try to summarize them the best I can but just know that I’ve collected a lot of these arguments from various other sites.
- -i is the input application as described in the RTMP section. FFMPEG takes its input from that, which is the stream from the PC.
- -vb, –minrate, and -maxrate are all set identically to 3500k. FFMPEG doesn’t support setting a constant bit rate (CBR), so this is how you do it. In my case I’m limiting the output to 3.5Mbit/sec.
- -bufsize is recommended to be around twice that of the bitrate. In my case I set it to 7k.
- -s is the scale setting and I’m reducing the stream to 720p, or 1280×720.
- -c:v is the video codec to use; in my case I want to use the libx264 library.
- -r is the frame rate: 60 FPS.
- -g is the Group of Pictures, and it’s recommended to be twice that of your -r setting. So 120.
- The next set of arguments ensure that the keyframe is set to 2 seconds. Twitch requires 2 second keyframes, so these arguments are set to 120 since I’m sending 60 frames per second (2 seconds x 60 frames/second).
- -sws_flags sets the scaler flags. In my case I use the lanczos scaler.
- The -tune and -pix_fmt arguments were suggested by various websites and I have to be honest I’m not positive of what they do. Feel free to experiment with them on your own.
- -c:a is the audio codec, and in my case I’m just copying the incoming.
- -f is the file type of the output, and in my case since it’s a stream, flv.
- -strict is how strictly to follow the standards. I set it to normal.
- The final argument is the output, which is the second RTMP application.
As you can see, I also have STDOUT and STDERR directed to /dev/null. I don’t have STDERR redirected to STDOUT first, because there are times when I need to see STDERR from ffmpeg. Therefore I leave it separate.
OBS Settings
For OBS Studio, I have the Stream section set to a custom stream target, and the address is rtmp://my_server/app1. In the key section, I just put my made-up key in. On the Audio tab in the Output section, I set the bitrate to 160. Everything else for OBS Studio is configured as described in my video on the topic.
Does it Work?
For some reason, the rtmp module for nginx has a lot of trouble starting ffmpeg and keeping it running properly. In some case, the following error pops up in the nginx error.log:
2017/01/15 18:39:12 [alert] 43536#101590: kevent() error on 10 filter:-1 flags:4000 (9: Bad file descriptor)
2017/01/15 18:39:12 [alert] 43536#101590: unknown process 44067 exited on signal 9
Other times, ffmpeg stays running but it never seems to pulls any data from nginx. In both of these cases, I run the following command as root:
killall ffmpeg
which stops any running ffmpeg processes in the background. Nginx will restart it automatically, and so far: it does so properly. As soon as ffmpeg is restarted, my twitch stream lights up.
This isn’t ideal, and I still can’t figure out why nginx and ffmpeg have so much trouble together. No Internet searches have helped. However, I’ve accepted it because when it’s working, it works well. And it’s allowed me to make better use of the hardware in my house without having to buy a streaming PC.
2 thoughts on “Using FreeBSD to Stream to YouTube and Twitch”