[toc]
Introduction
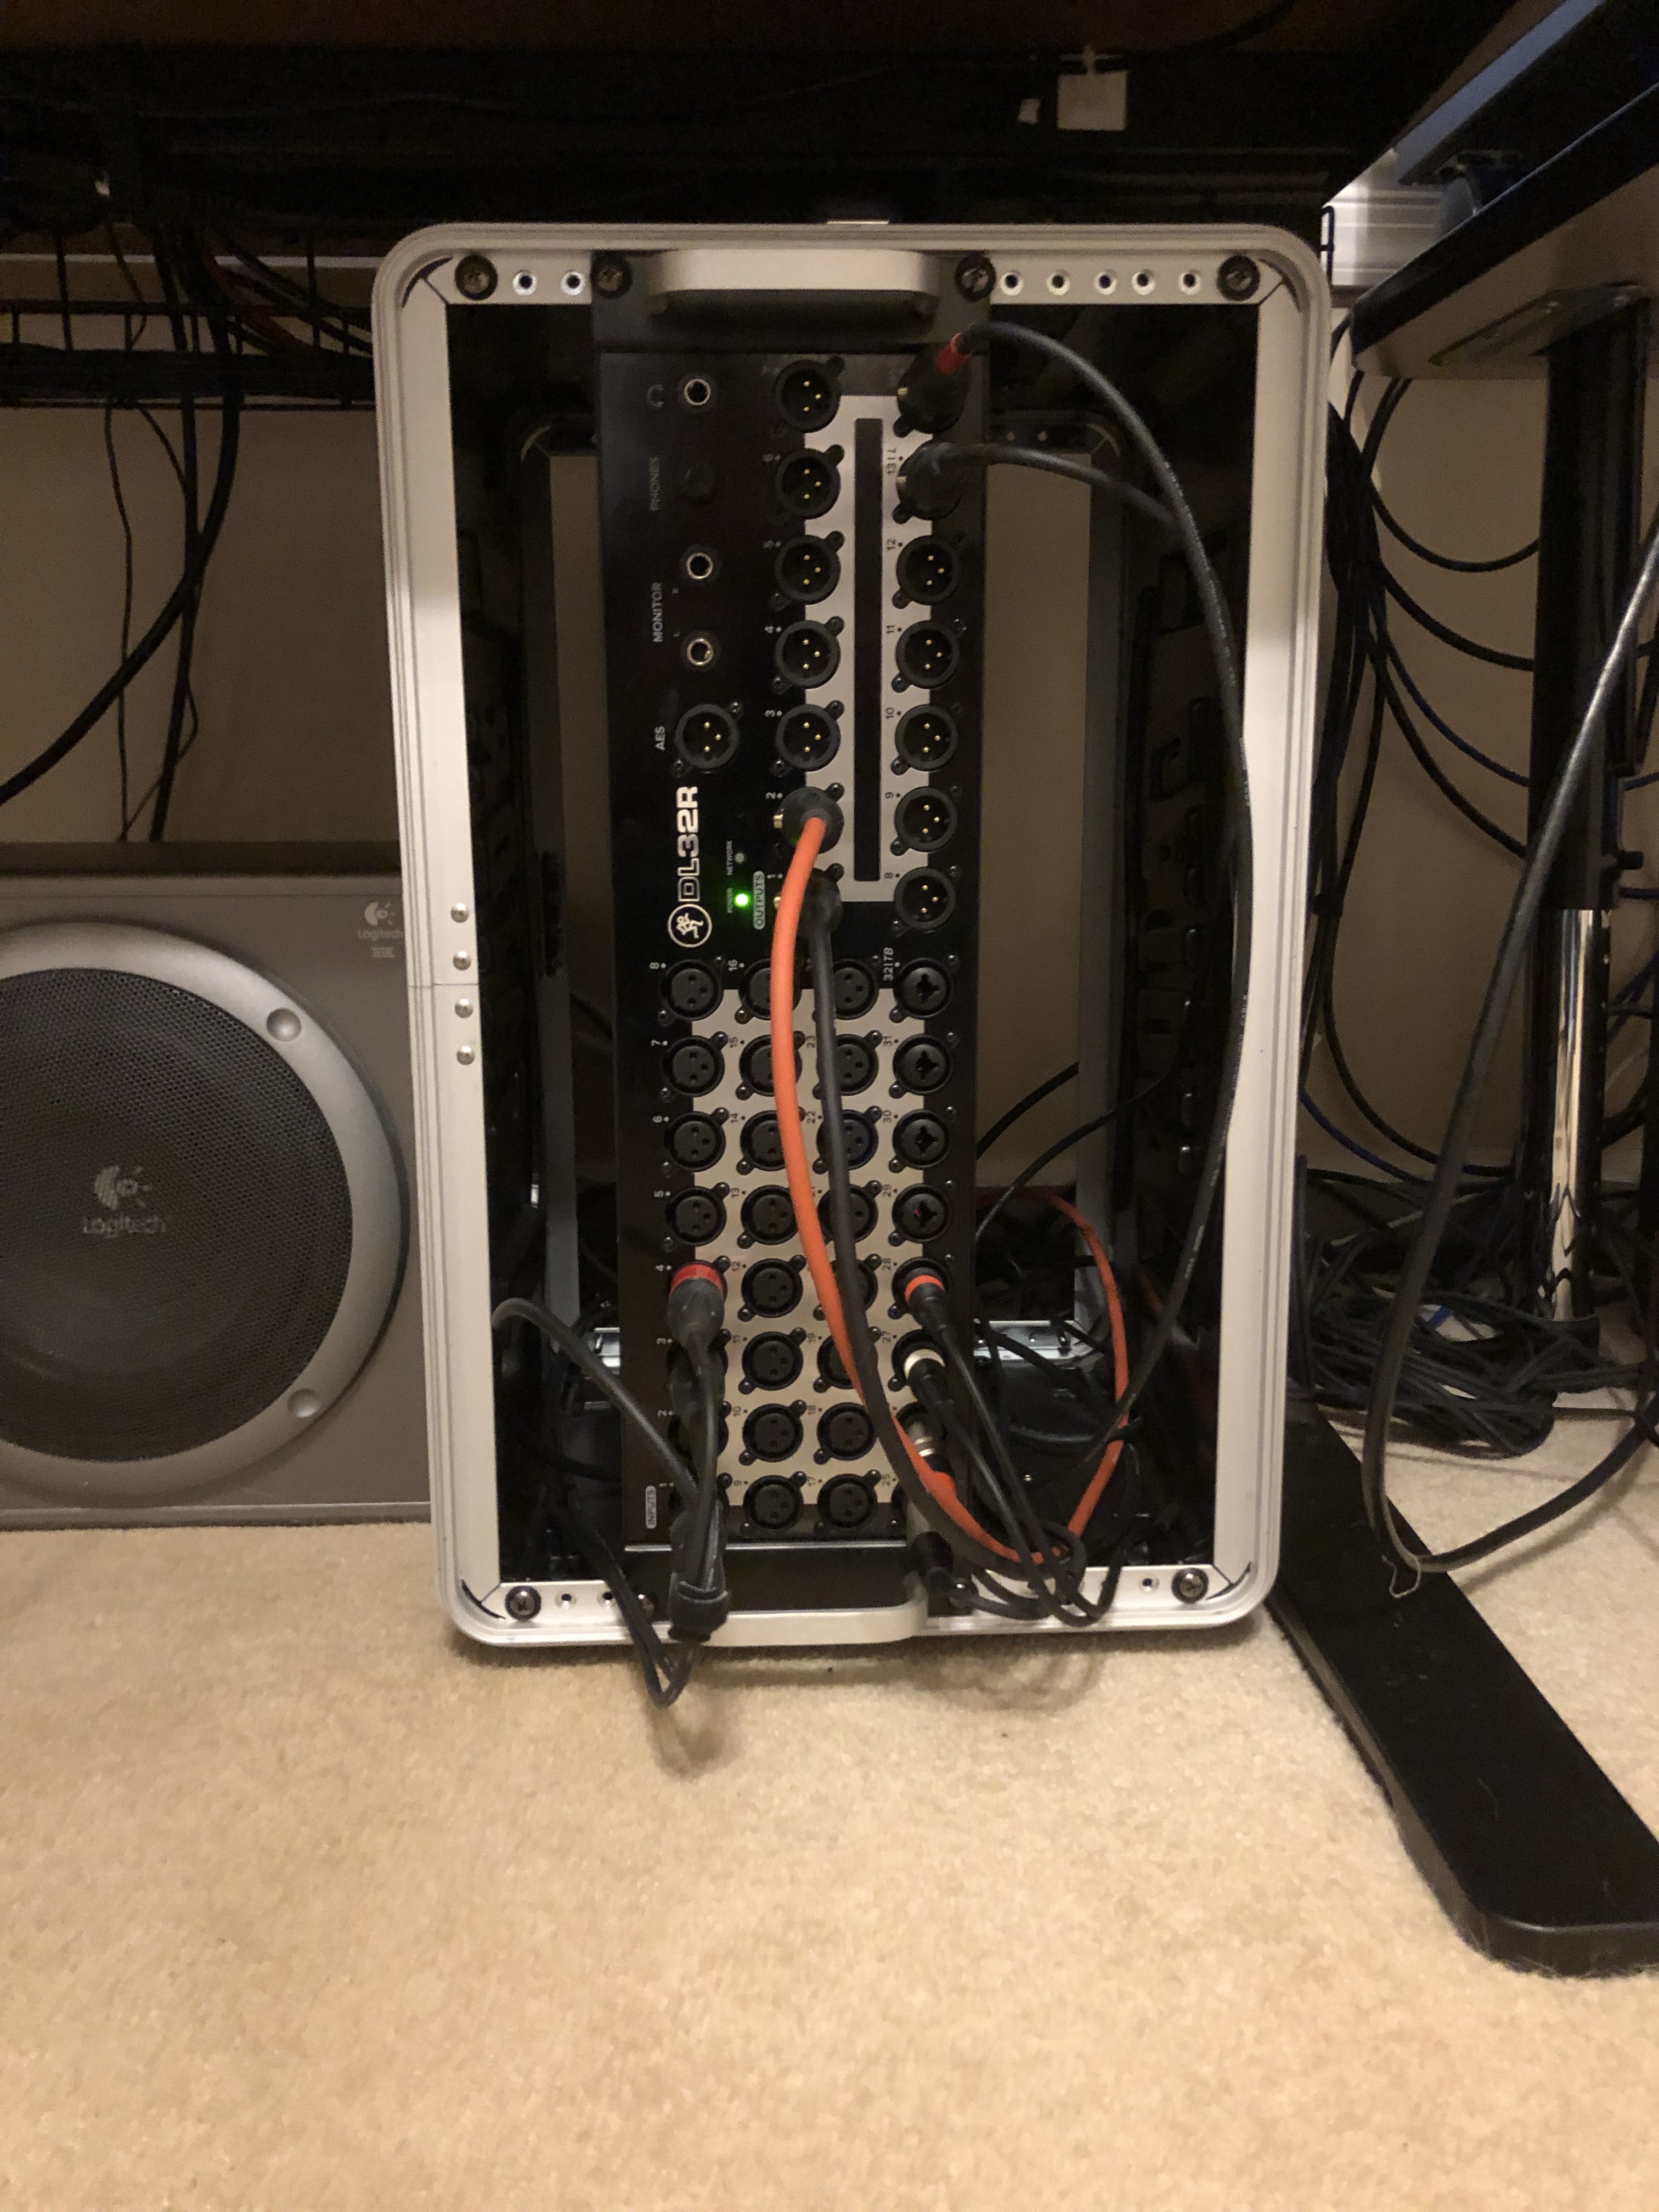
In my Twitch Streaming Setup entry, I spent a section discussing my Mackie DL32R rack-mounted mixer, and how I have it connected up between the 2 PCs. The purpose of today’s entry will be to discuss how I have the DL32R actually configured from an input, output, and routing perspective. I understand that the audience for this one will be limited to folks who are either comfortable with the DL32R, or are interested just for the sake of learning. In other words, this won’t really be applicable to many.
With that out of the way, let’s get this thing going.
Physical Connectivity
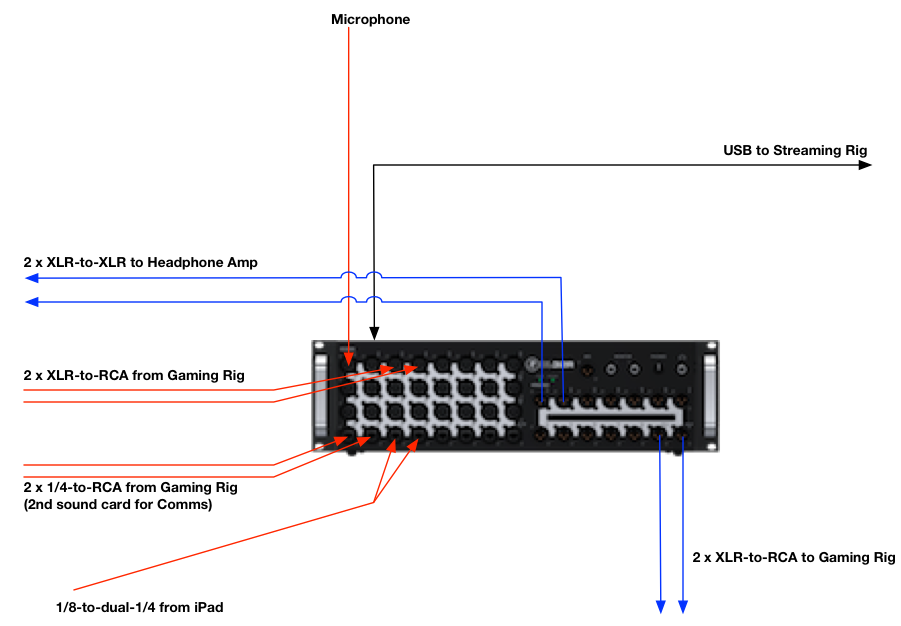
I used the above drawing in the previous document, but it’s useful here, too. I’ll explain everything that’s connected physically, then I’ll go into the logical configuration.
Inputs
- Port 1 (XLR) to my Rode Broadcaster Mic: This should be self-explanatory. It’s a microphone for me to transmit my squeaky voice.
- Port 3+4 (XLR to RCA) to the RCA outputs of the first SoundBlaster card in my gaming PC: The default sound output for my Windows gaming PC. All gaming and other system-related sounds are fed into the mixer via these inputs.
- Port 25+26 (1/4 to RCA) to the RCA outputs of the second SoundBlaster card in my gaming PC: The gaming PC has 2 SoundBlaster cards in it. The second one is assigned to communication software duty. Software such as Teamspeak and Discord. This allows me to independently change the volume of my games and my comms software for both my headphones (I need to hear my buddies!) and the streams.
- Port 27+28 (Dual 1/4 to single 1/8) to iPad for music: I have an older iPad, the first generation with the Lightning port on it. It’s pretty slow by today’s standards. It sits on my desk right in front of me with the Slacker application running. Its only job is to play music through its headphone port (1/8″) which gets fed into a 1/4″ split cable and then into the mixer.
Outputs
- Port 1+2 (XLR to XLR) to the inputs of my headphone amp: I need to hear what’s going on in the games, the comms, and from the streaming PC. And I like to listen to the music during breaks in the gaming. So I’m feeding one pair of physical outputs to my Sennheiser headphone amp. I could use the onboard headphone amp, but I like the fact that it’s a balanced connection to the amp and then all the way to my headphones (HD800s).
- Port 13+14 (XLR to RCA) to the RCA inputs of the first SoundBlaster card in my gaming PC: This is how I get my voice back to the gaming PC.
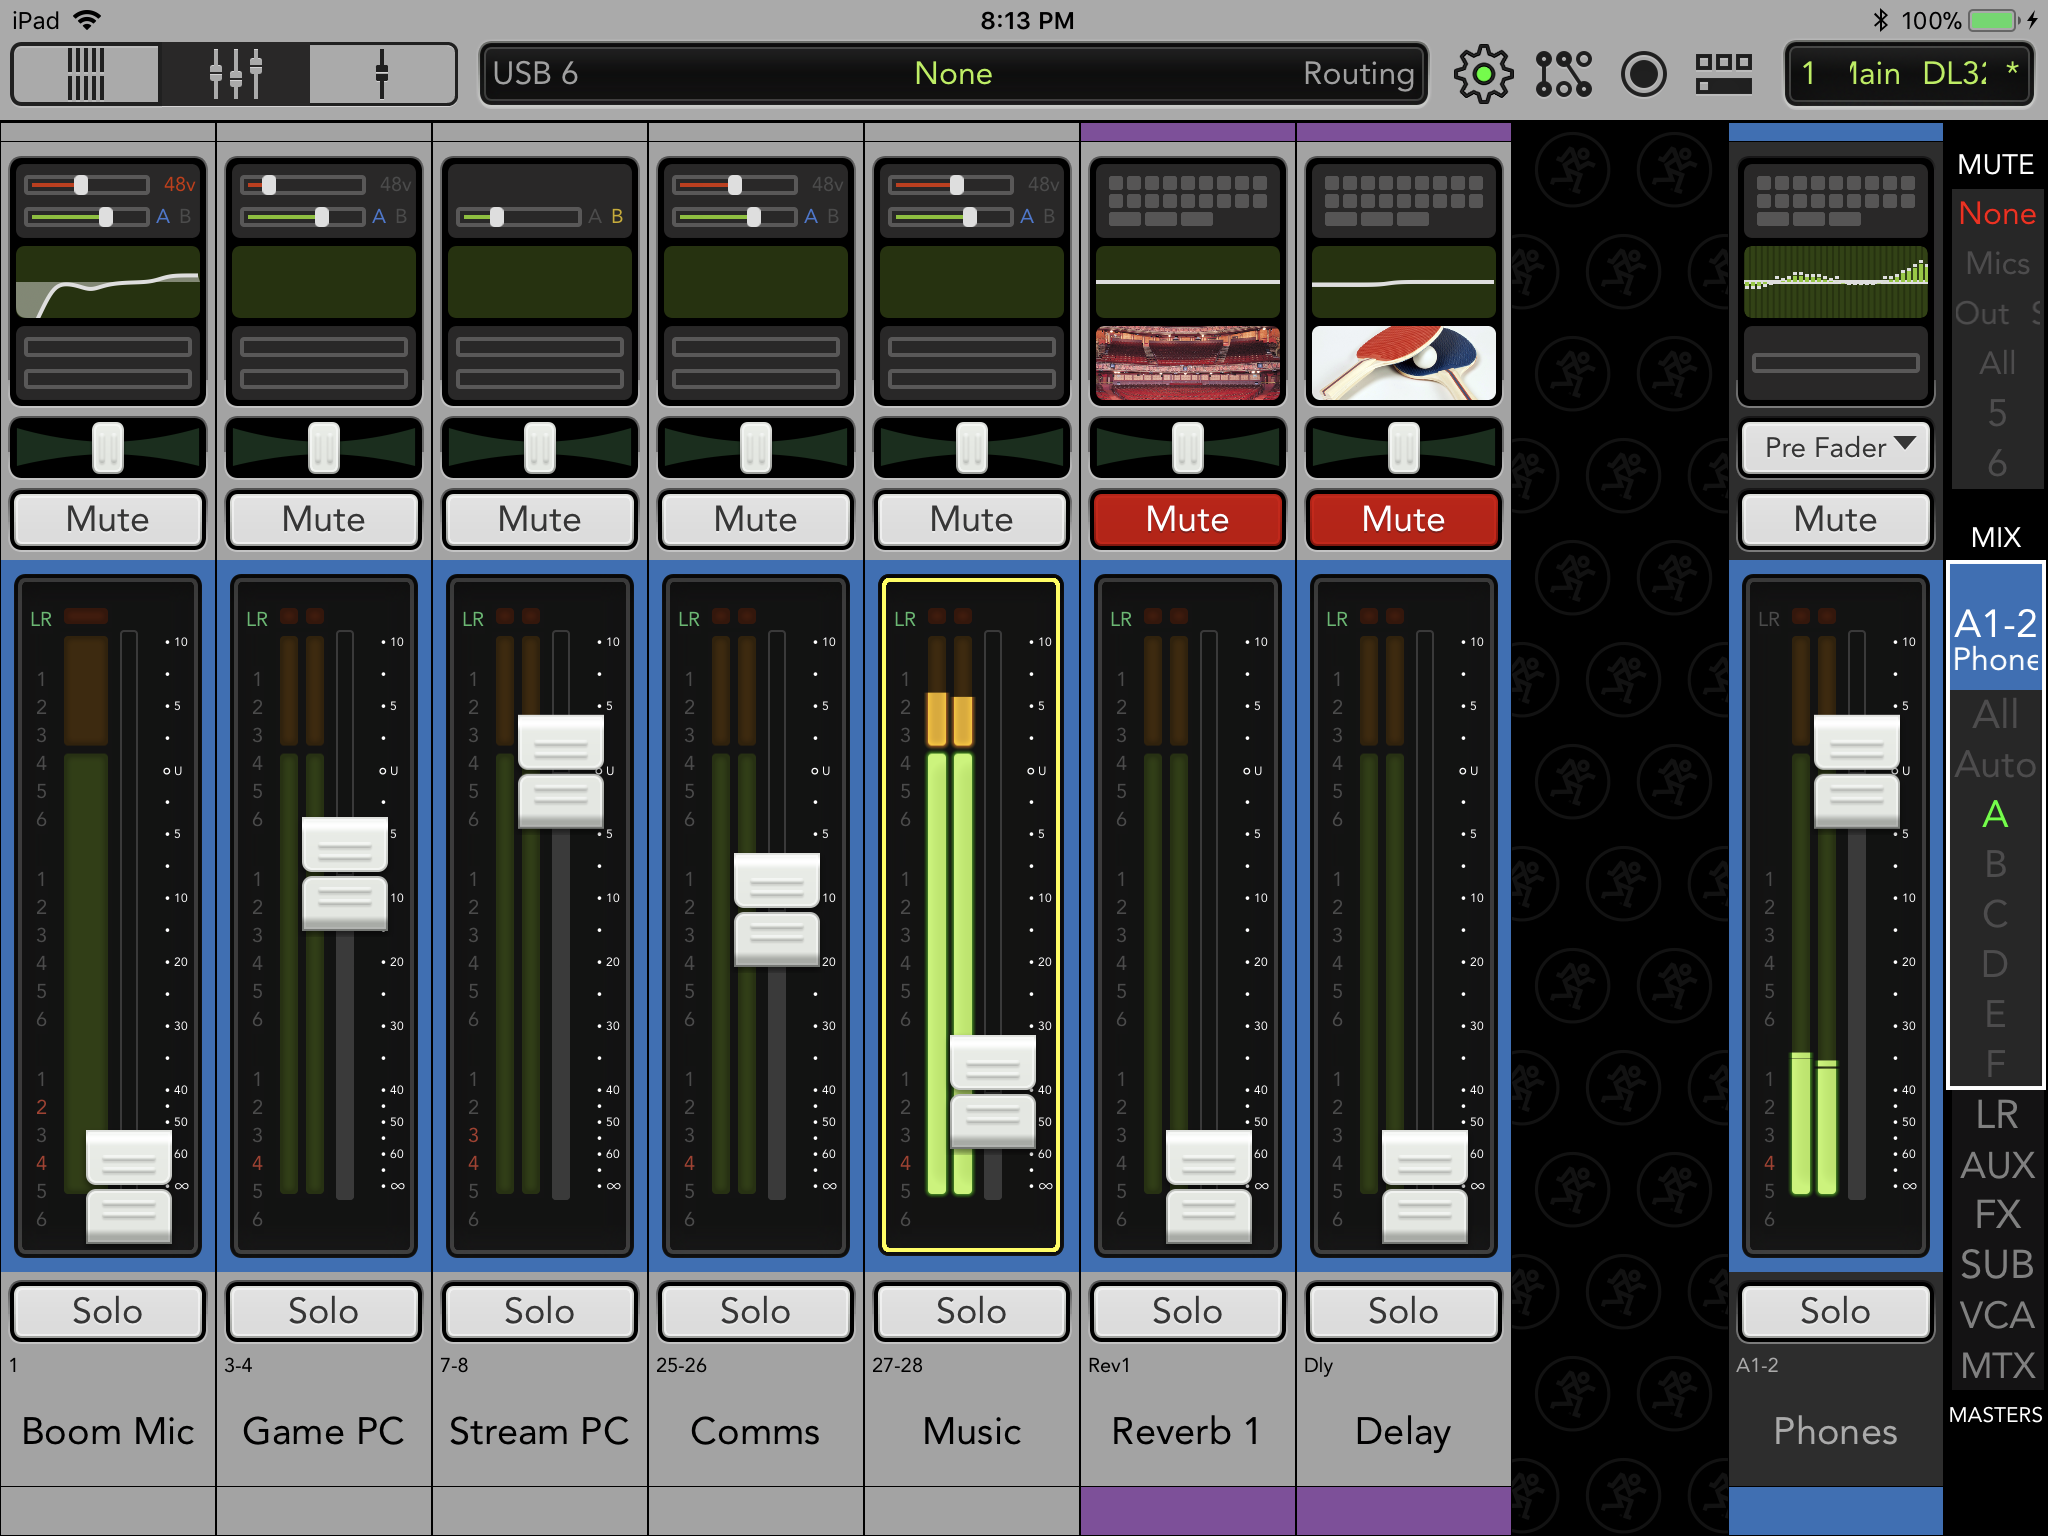
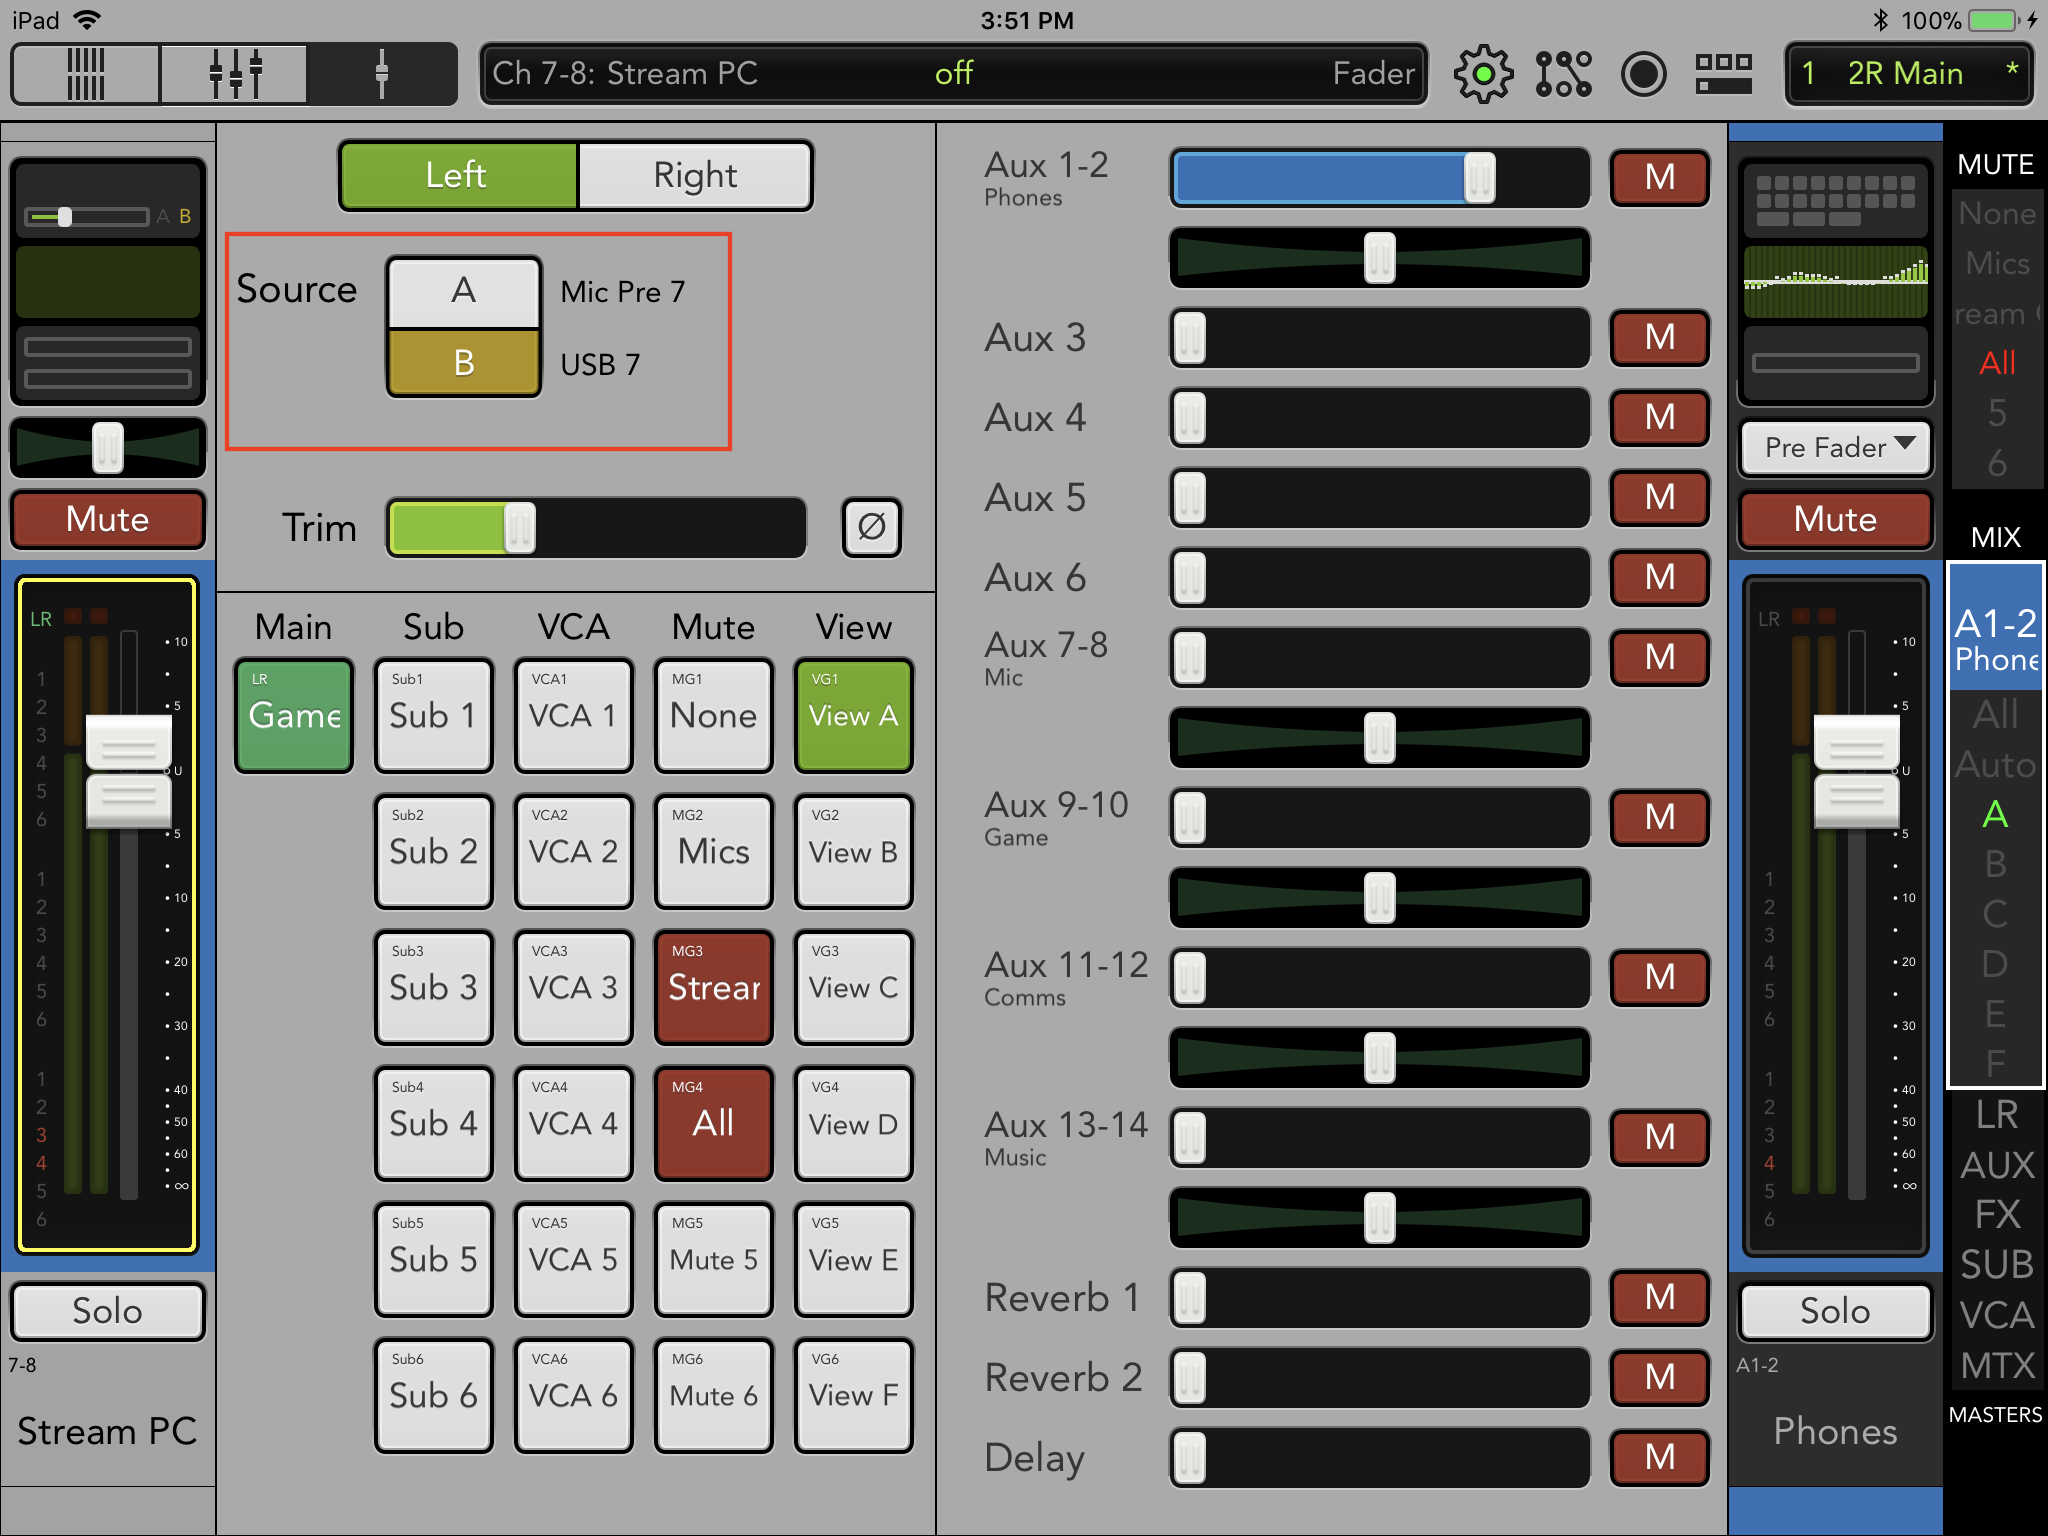
The image below is a screen capture from my iPad running Mackie’s Master Fader app. Specifically it’s showing the fader settings I have for the physical Aux outputs 1 and 2. As the above list states, they’re bound together into a stereo output and being fed into my headphone amp. More importantly, you can see that I’ve renamed the input names, but the actual inputs they reference are still visible right above the name.
Astute viewers will noticed I missed one of the inputs. Further, there’s a set of 4 outputs that I’ve also skipped. The reason for that is they’re done via the USB connection. We’ll get into that next.
USB Connectivity
The DL32R has 2 USB ports on the back of it; only one of which can be used at a time. One port is for attaching USB storage directly to the mixer so that you can record live music directly to. Or you can play music tracks from it, if you want. The second port is for running to a PC or Mac. Mackie’s intention for this port was that it would present a single ASIO device to the operating system, and you’d use your favorite DAW to assign inputs and outputs as needed.
We won’t get into the complexities of a DAW in this post; it’s not actually pertinent to what I’m doing. Because what I’m doing isn’t exactly what Mackie had in mind when they designed this. But, ssshhhh… don’t tell them.
A Little Story…
It’s the second USB port that encouraged me to upgrade my DL806 to the DL32R. But what if the USB port didn’t work the way I wanted? I searched online for any references to the bigger mixer’s USB port: would it present independent channels to the Windows operating system, or was it just a single ASIO device? No one could tell me. I even called Mackie and asked them. The support guys that answered the phone weren’t sure; and to be fair that was probably outside their usual set of questions.
However, there was no point in spending the big bucks on the larger mixer if the USB port didn’t do what I wanted. With that, I found a local music shop that actually had a DL32R on display. They were more than happy to let me come take a look at it. I packed up my Macbook Pro and: off to the music shop.
As I figured, the moment I connected my Mac to the Mackie, the mixer appeared to OS X as a single ASIO device. That didn’t surprise me in the least. But it wasn’t what I was really there to test. I fired up Parallels Desktop on the Mac, booted into Windows 10, and tried again. I told Parallels to let Windows have access to that USB port and was instantly rewarded with what I wanted to see: 16 independent stereo Playback devices, and 16 independent stereo Recording devices.
Basically it was like adding 16 new sound cards to the Windows operating system. Perfect. That’s precisely what I wanted. OBS Studio on my streaming rig would be able to latch on to any and all of those devices.
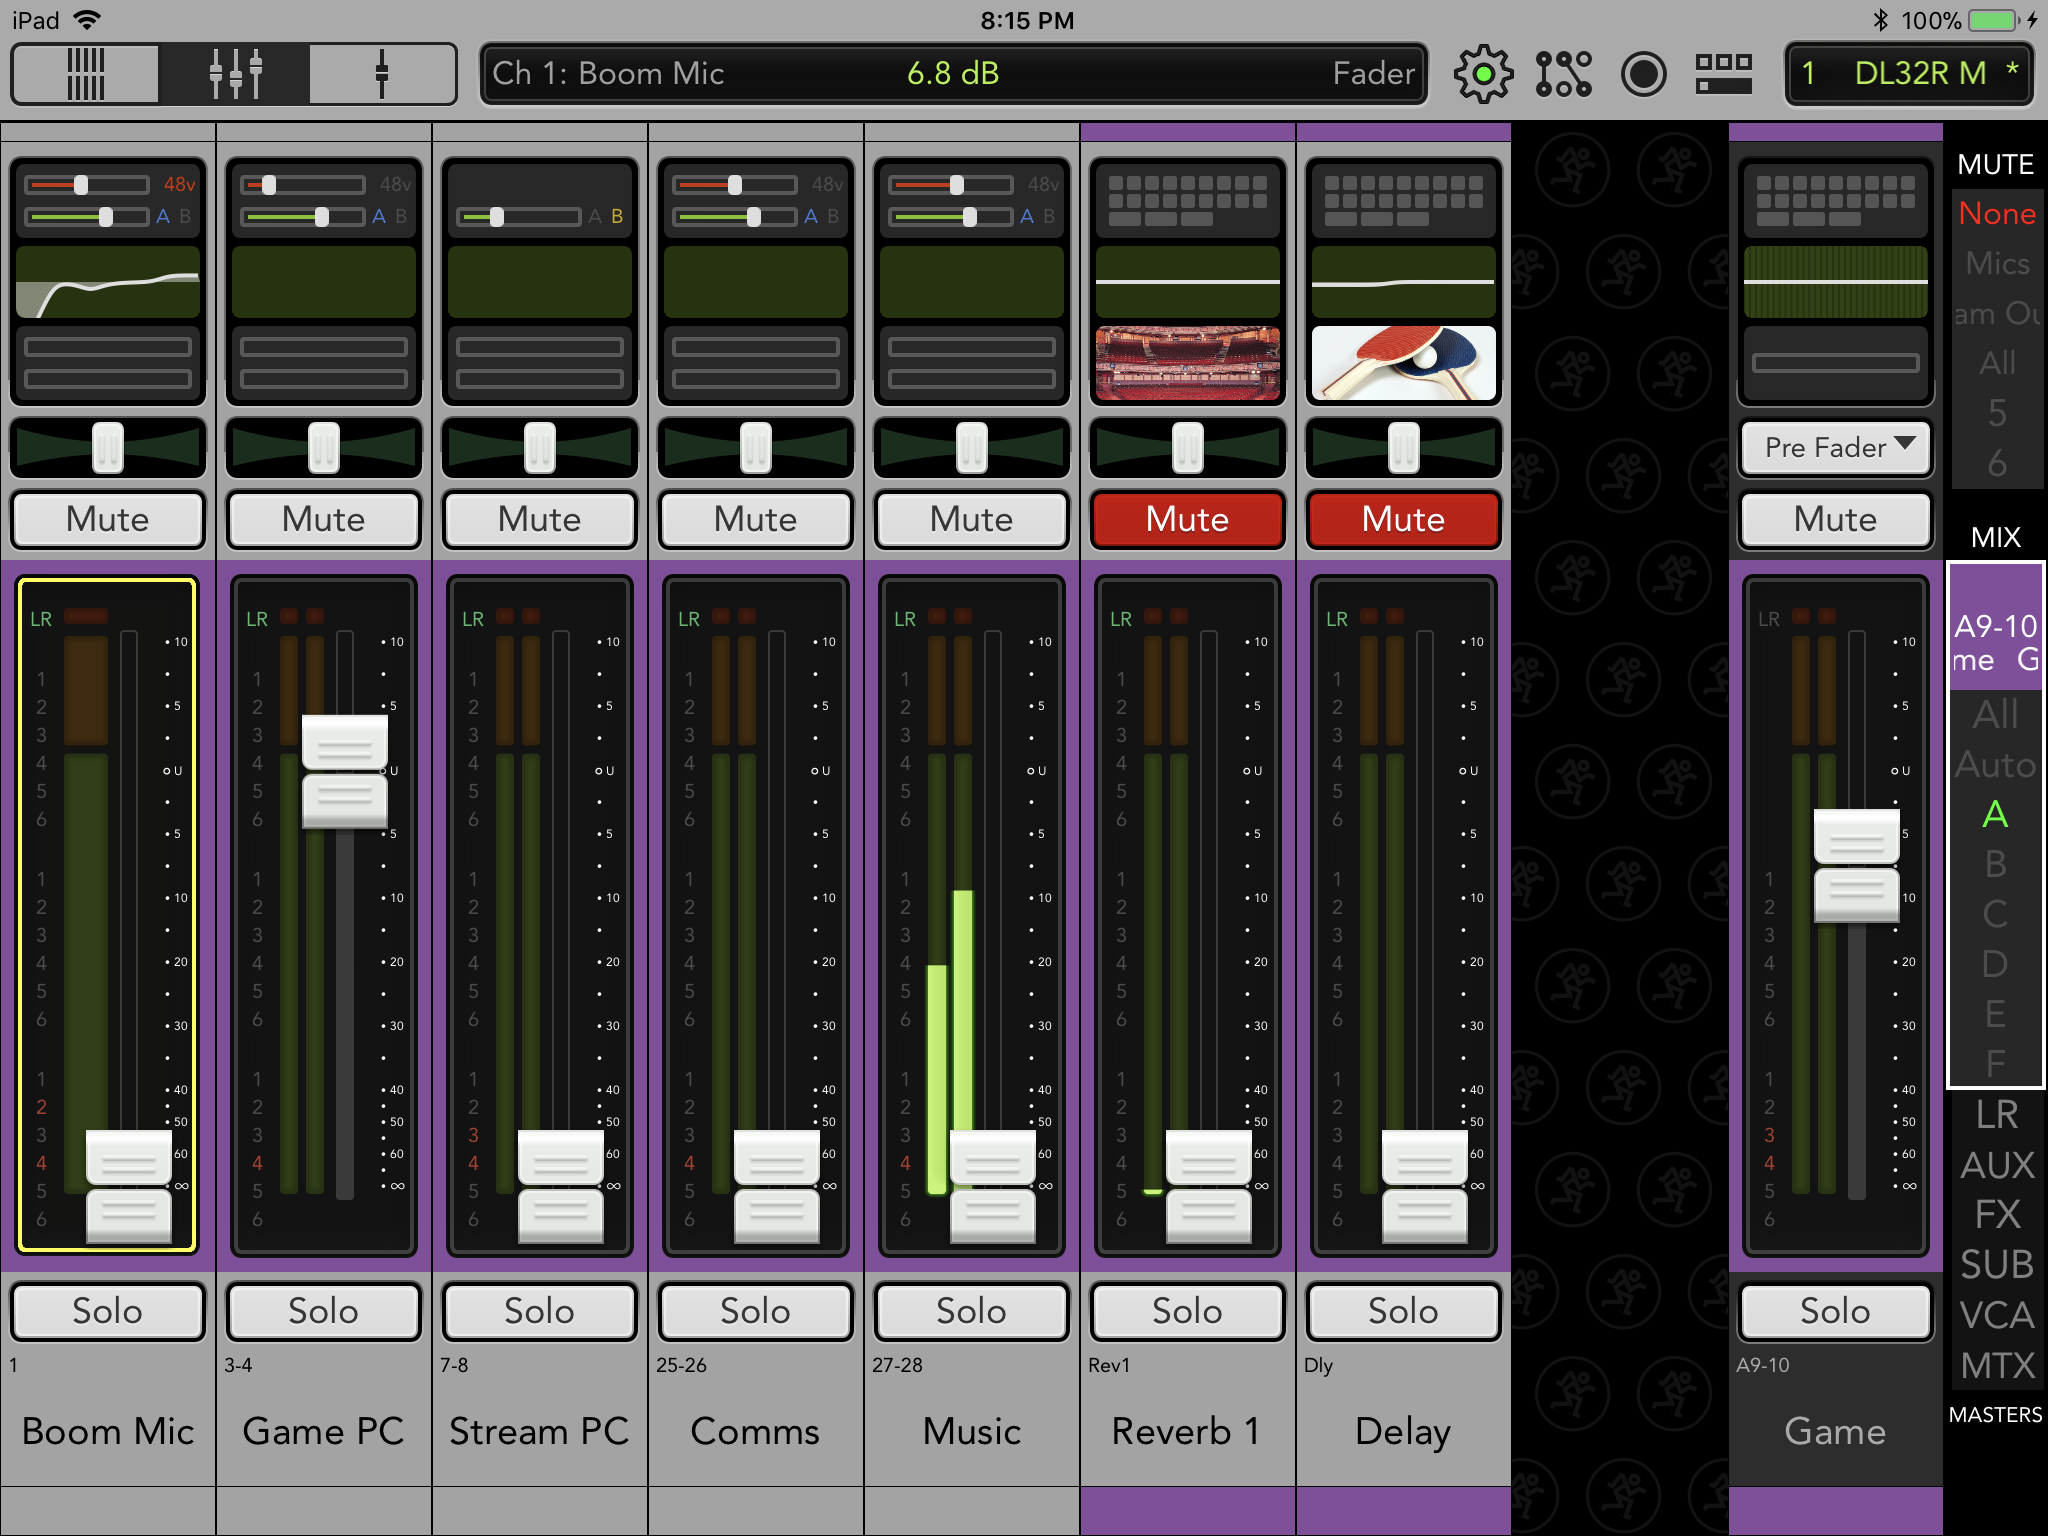
Inputs
If you look closely at the picture above, you’ll see that I have a fader labeled “Stream PC”, and it’s assigned to inputs 7+8. Look even more closely, specifically above the fader. You’ll see that most of the inputs are on the “A” channel and they have a little red slider bar above them. That’s the gain setting. But the Stream PC fader is on the “B” channel and doesn’t have that gain bar.
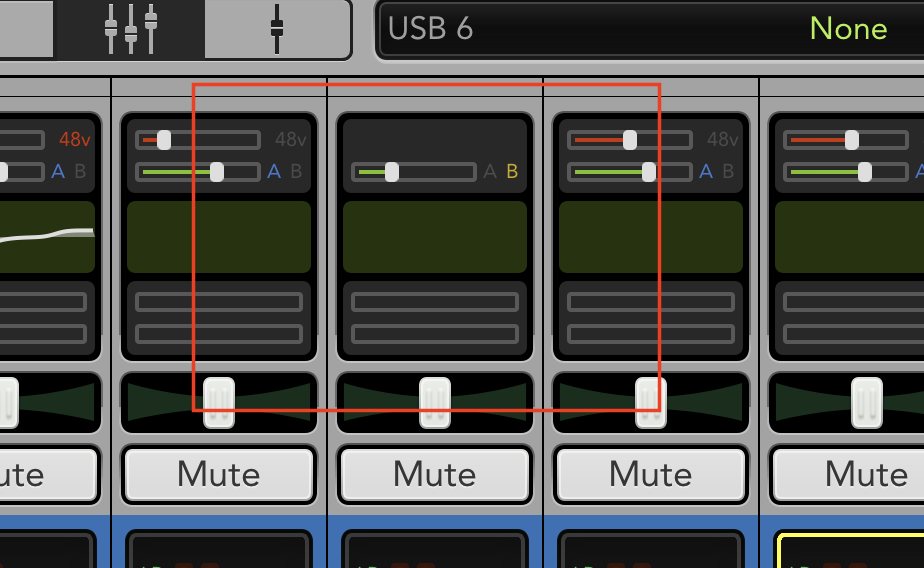
Simply: that means it’s coming over the USB connection. The Master Fader app makes it ridiculously easy to assign USB inputs. You just touch that section above the fader and tell the mixer that those inputs are “USB”, as shown below.
What’s this being used for? I need to hear what the streaming PC is doing. Specifically, if I get alerts for new Twitch followers or subscribers; that sound comes from the streaming PC. Folks watching the stream will hear the alert; unless I patch the streaming PC’s output back to the mixer, I won’t. So I assigned one of those 16 Playback devices in Windows to be its default sound output, and it just happens to correspond with USB channels 7 and 8 to the mixer. I’ll try to explain that a bit more clearly down below when I display some of the Windows setup.
Outputs
Setting up the outputs over the USB connection takes a little more work, but it’s nothing too difficult. The key point is to start with the Routing configuration in the Master Fader app. You get to that by touching the icon in the image below:
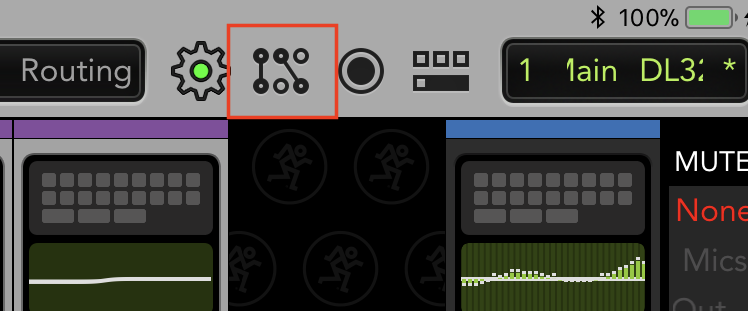
When you do that, you’re presented with a new screen. The important tab on this screen is the one marked “USB”.
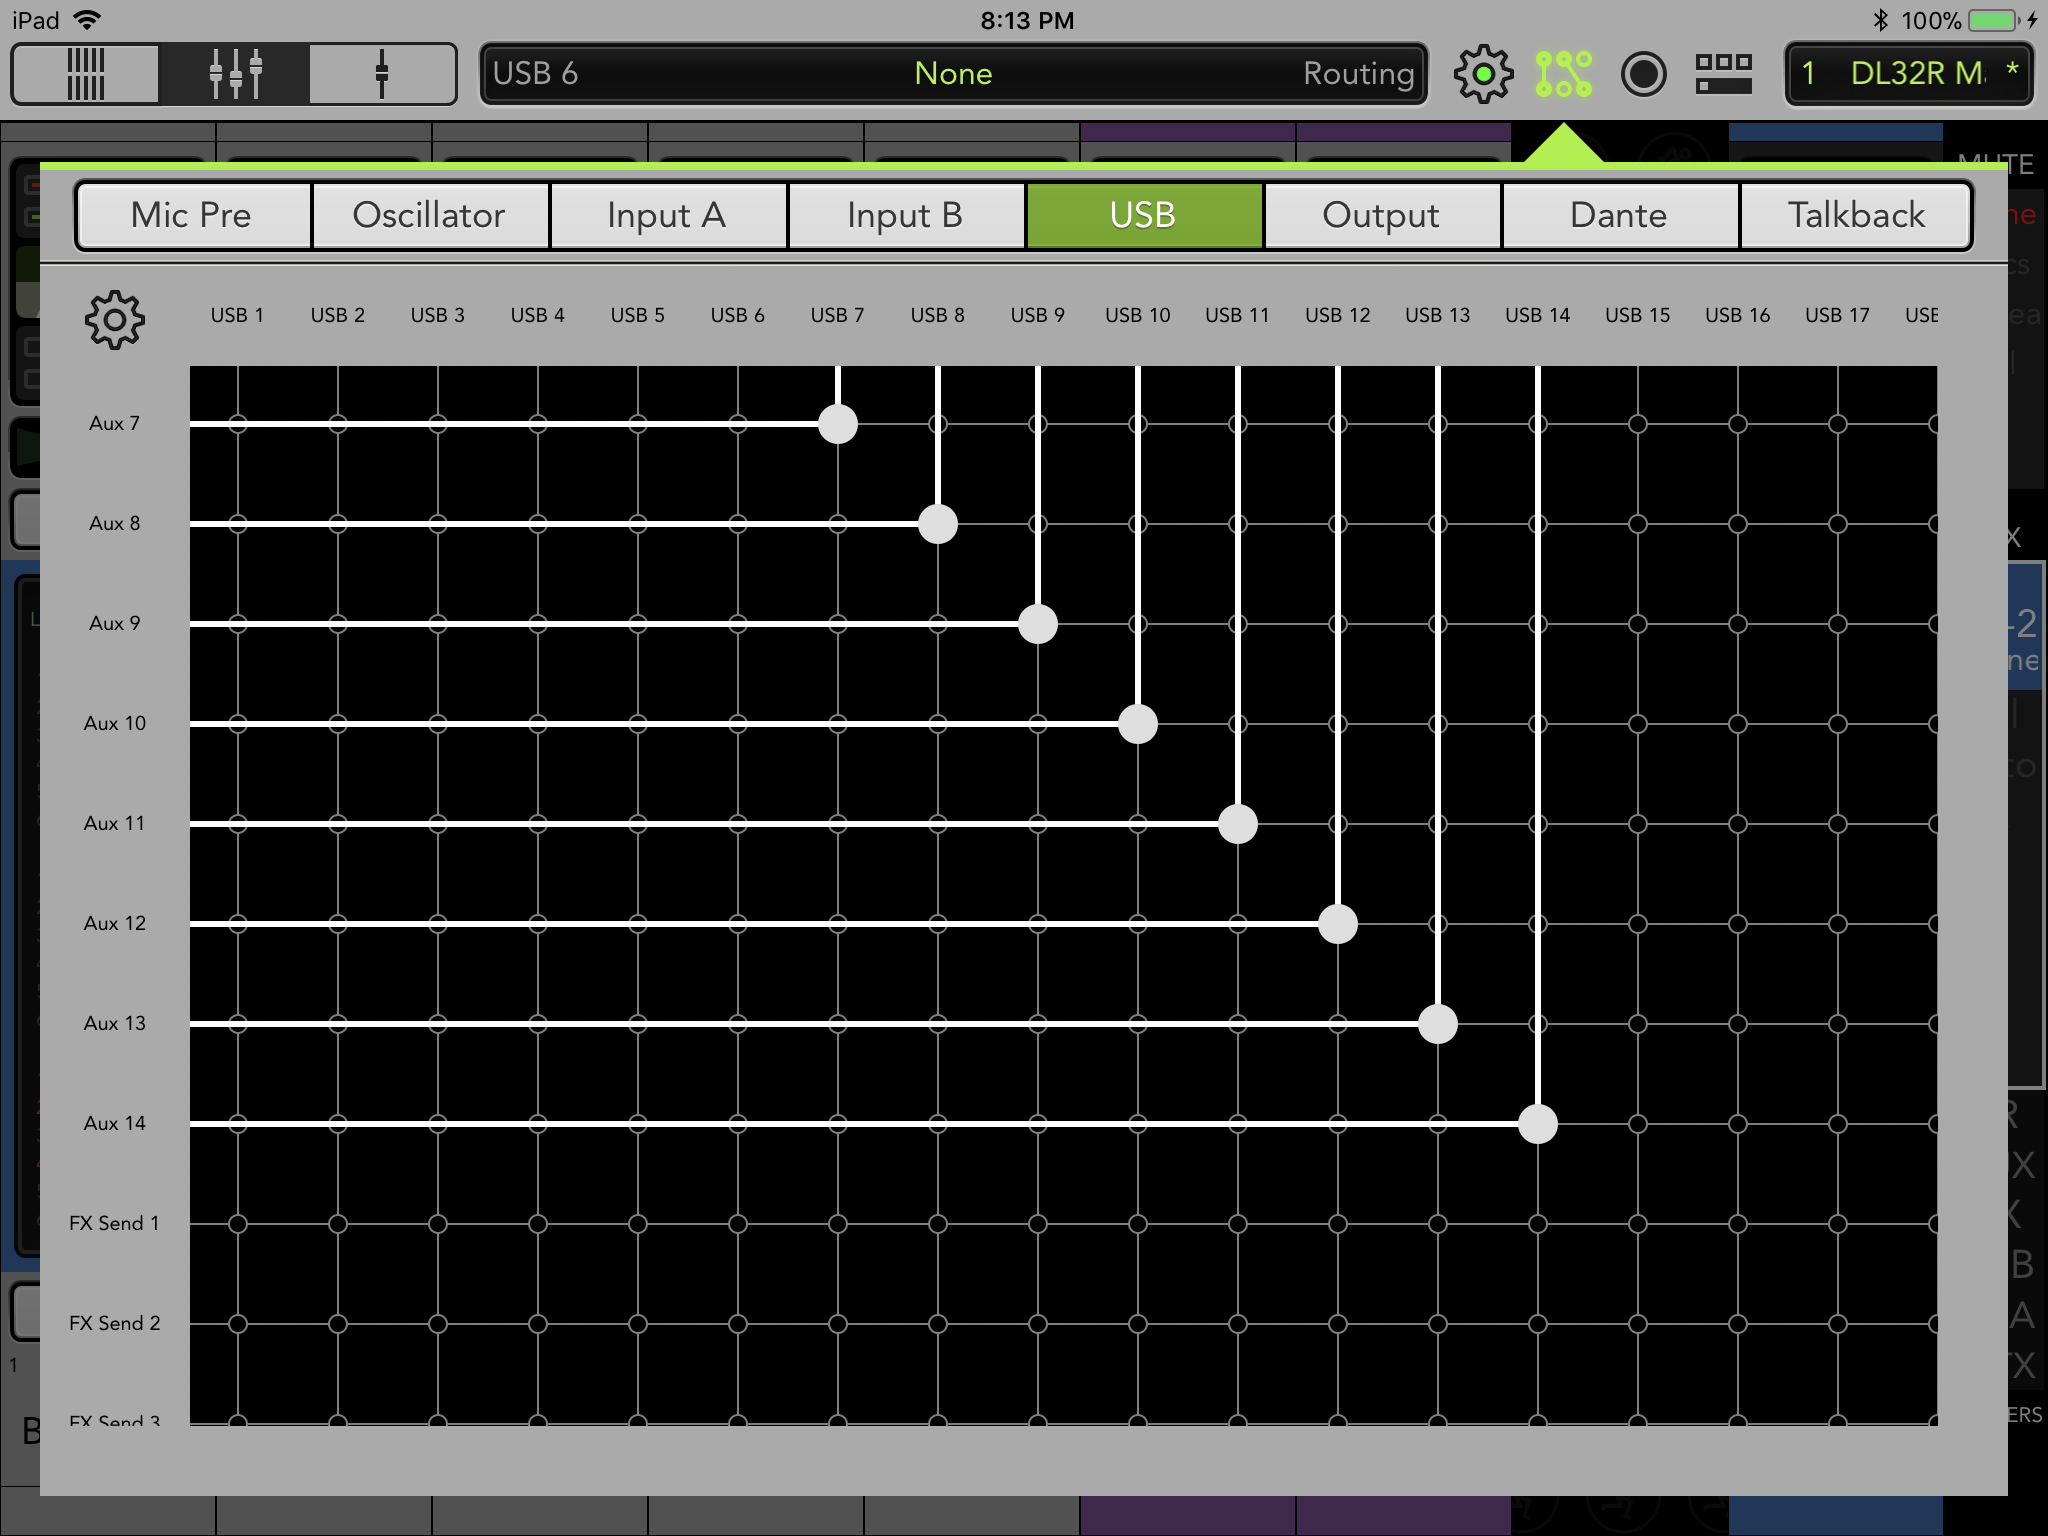
As you can see: it’s like a simple patch panel setup. These are the outputs, by the way. The USB inputs are handled in the “Input B” tab, which we don’t need to get into. I already set that up in the previous section.
The point here was to assign USB channels to specific Aux outputs. The reason for doing that is so that I can control them independently on the main screen. In other words, they’d be acting like the physical Aux outputs, but would be logical instead. For simplicity’s sake, I just aligned the USB channels with the Aux channels and called it a day.
- USB 7+8 – Microphone: The output for my aforementioned squeaky voice, into the streaming PC.
- USB 9+10 – Gaming PC: The sounds from the game I’m playing.
- USB 11+12 – Comms: This output is from the aforementioned communications applications; completely independent of the game sounds even though they’re coming from the same PC.
- USB 13+14 – Music: The output from the iPad is sent through this stereo pair and into the streaming PC. Now folks can listen to the same rock and roll that I am during breaks in the games.
And if you look at the image below, which shows the outputs of the Mackie, you can see everything I’ve discussed so far, including the physical outputs:
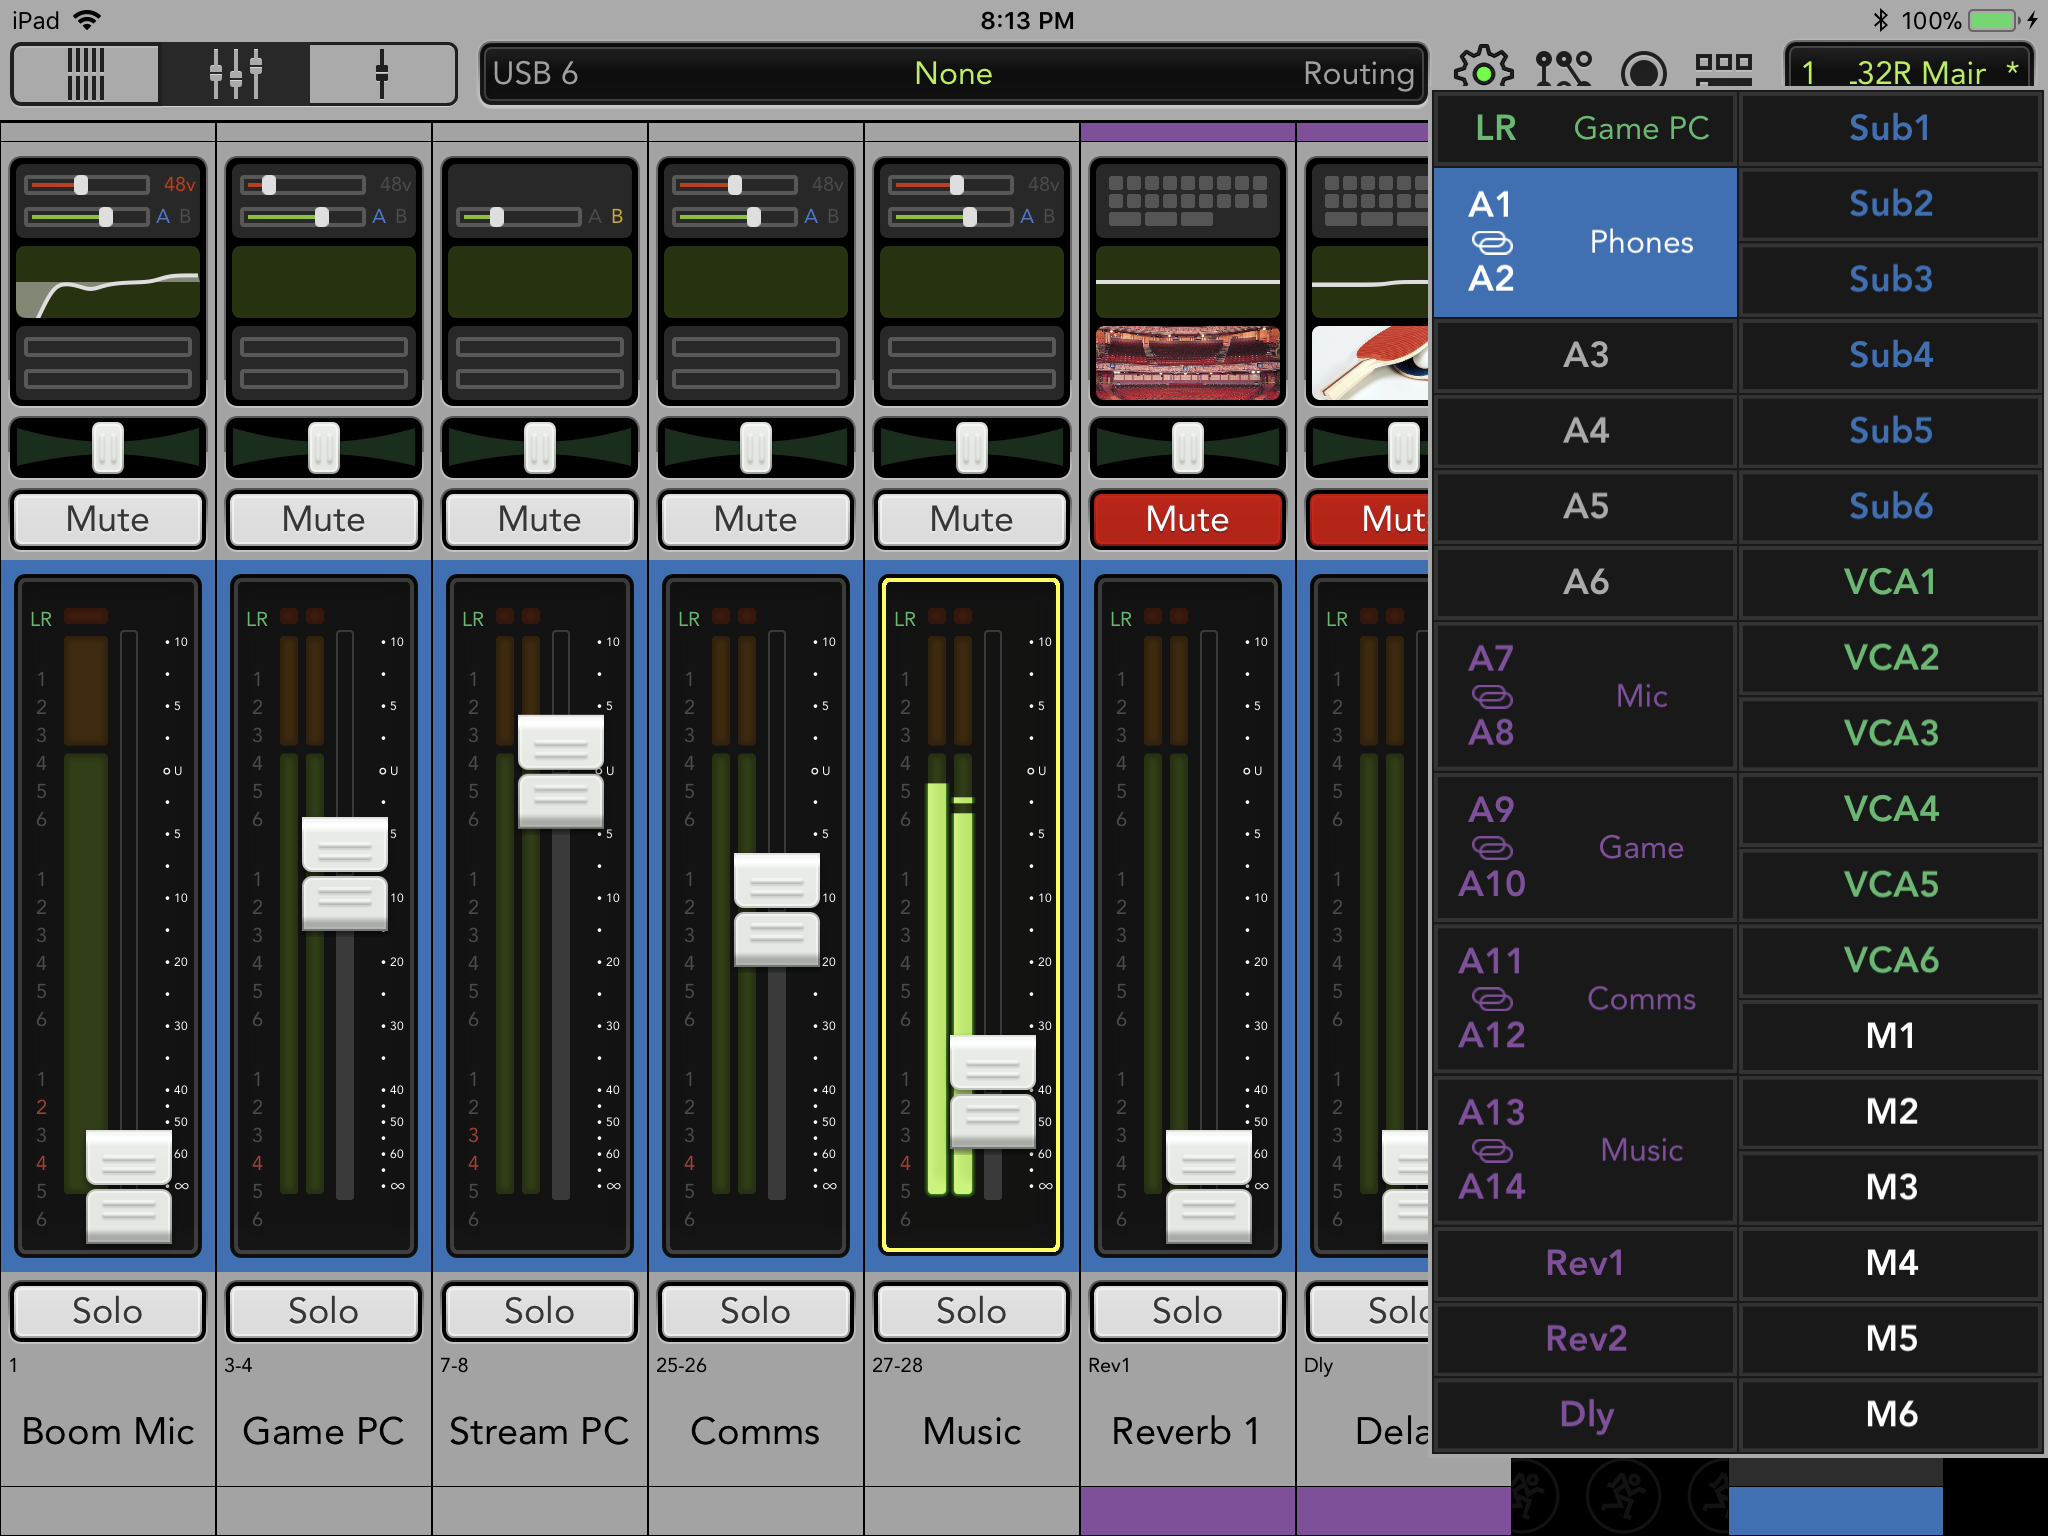
As an example, look at the following image from my iPad. It’s of the “Game” output. All it has as an input is the “Game PC”. Basically I’m 1-to-1’ing the output channels for USB. It may seem like a bit of a waste; if I weren’t using this to set up a streaming PC, I’d agree with you. But there’s a method to my madness.
With this setup, if my (small) Twitch audience says that the, “Game is too loud!” I can change it easily on the mixer without affecting any of the other outputs. “We can’t hear you well enough!” OK, I can crank the Mic output if need be. “Comms too loud, they’re blowing you out!” Yep, got it. Switch to the purple (colored that way to represent 1 of the outputs to Twitch, who’s color is purple) Comms output and adjust the fader.
Adjusting Levels Through OBS
I know what you’re thinking: “Jason, why not just adjust the input levels for each channel on OBS Studio?” I could do that. But it’s much easier to have the control right at my finger tips on the iPad that’s sitting next to my left hand. It’s incredibly easy, and fast, too. Much more so than taking my right hand off my game PC’s mouse, putting on my stream PC’s mouse, and then adjusting the faders on OBS. If you’ve used the Master Fader app, you understand how intuitive and easy it is to use, and how it can quickly become almost muscle memory for you. That’s where I am with it, now.
But You Said…
In the last document, I did say that I use these independent mixer outputs (meaning inputs on the PC) so that I could easily mute certain channels through OBS. The reason that’s even easier than using the Master Fader app is that I also have an Elgato Stream Deck connected to my streaming PC. And it can talk directly to OBS Studio; specifically with a simple push of a button, any audio channel can be muted/un-muted. In other words, it’s even faster and easier than Master Fader because it’s a single button press; and the Deck is also right near my left hand.
Streaming PC Setup
That’s pretty much it for the Mackie. Other than adjusting faders as I need to, I don’t have to do much else. Master Fader is very easy to set up; some bits may take a little extra knowledge than others. But once it’s set, it’s set. I have everything saved into a “Show” so that if anything gets set out-of-whack due to experiments, code upgrades, or whatever, I can easily revert to a known, good state.
So with that, I’ll turn to the streaming PC’s audio setup.
Playback Devices
Windows 10 refers to sound outputs as “Playback Devices”. Sound cards, in other words. When the DL32R is connected to a Windows 10 PC, it presents 16 playback devices (which are inputs for the mixer!). For instance, my streaming PC’s Sound control panel looks like:
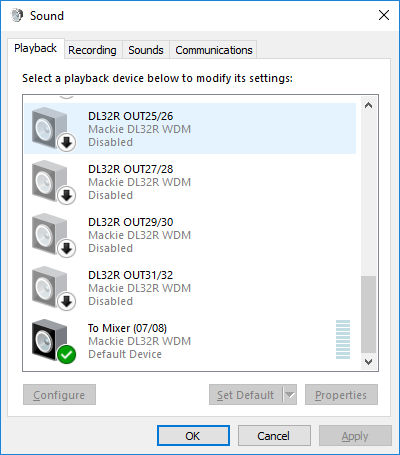
I’ve disabled the ones I’m not using, which why a bunch of those “DL32R OUT ##/##” devices are greyed out. But there are 16 of them in the Sound control panel. I’ve renamed one of them, the previously-mentioned channel 7 and 8 to “To Mixer (07/08)”. And I’ve set it as the Windows default sound output.
To keep things sane and clean, I also hide the disabled devices. So my Playback tab actually looks like this:
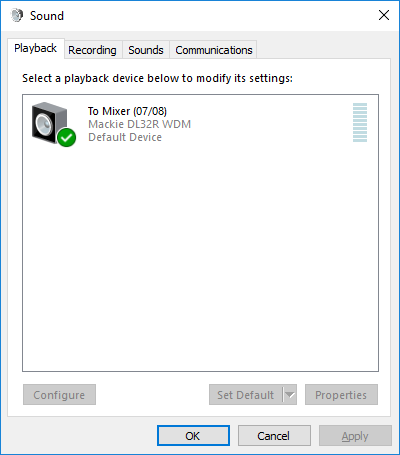
Pretty simple, huh?
Recording Devices
Windows 10 calls sound inputs “Recording Devices”. In other words: microphones, or lines in. Like the playbacks, the DL32R also presents 16 stereo recording devices (which are outputs from the mixer!) to the OS. For instance:
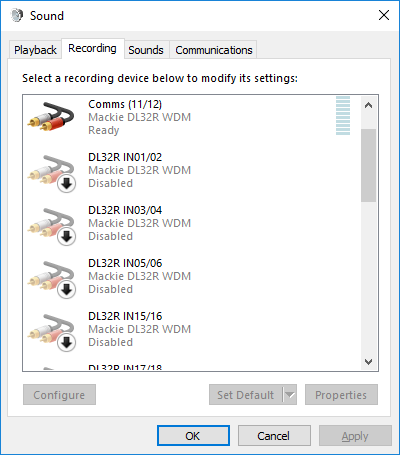
Again, like the playbacks, the devices are numbered in pairs. “DL32R IN##/##“; sixteen of them in total. I’ve renamed 4 of them as follows and kept the rest disabled and hidden:
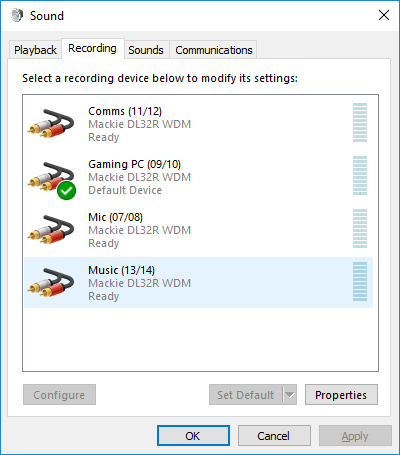
As you can see, I keep the channel numbers in parenthesis, so I can keep track of which ones are being used.
OBS Studio Setup
All of this USB work ultimately benefits one application on my streaming PC: OBS Studio. It’s what makes it possible for me to stream to Twitch.

As you can see from the above image: I have 4 “Sources” called: Music, Comms, Game, and Mic. And I’m sure you can put 2 and 2 together to figure out which “Recording” devices they’re each attached to. Also, in the “Mixer” tab in OBS, you also see the sound source called “Desktop Audio”. That’s the Windows default sound playback device. In this case, that means sending sound back to the mixer.
So… Why?
I wanted to use this blog post to explain how I’ve got the DL32R (and my streaming PC) configured for my gaming and streaming. Hopefully through the diagrams, screen caps, and copious words, I’ve succeeded in doing that. If you already own or are familiar with the DL32R, this should resonate pretty easily with you. If you’re familiar with the other DL-series mixers, than the USB routing may seem a bit foreign; but once you learn Master Fader, you end up picking this up pretty quickly.
But why’d I do this? Well I stated it in the last document as well as this one:
- Quick and easy independent level controls of each sound source when I’m streaming
- Even quicker and easier ability to mute/un-mute each sound source when I’m streaming
This solution does precisely that for me. Yes, it’s vastly over-done. But I’m OK with that.
A Note to Mackie
There’s product here. And I think you have all the bits ready to go for it except the chassis and changes to Master Fader. I’ll explain what I mean. Imagine another DL-series mixer; call it the DL-Streamer or whatever. Cut down the physical inputs and outputs, which will also let you cut down the number of Onyx pre-amps. Maybe 4 in/4 out, or 6 in/4 out, or something like that. Remove the physical gain knobs so that it can be all set digitally.
Add to it the logic and controller for the computer USB port (not the storage one!) This is the winner, here. Have it present a lower number of channels to the Windows PC. Maybe 16/16 (8 stereo/8 stereo).
But make some changes to Master Fader, too. For this mixer, get rid of the USB routing. And in the Selector Strip, have the USB outputs already listed, like the Aux sends are. Perhaps even have them pre-bound together in pairs; basically, treat the USB channels like they’re normal inputs and Aux sends.
Equip the mixer with the same set of compressors, gates, and equalizers that the larger DL-series mixers already are. Don’t bother equipping it with the slot for the iPad, or the Lightning port. Make it purely a network-controlled device like the DL32R is. That’ll allow a much smaller chassis, too.
With this, you have a mixer that Twitch, Mixer, YouTube, and Facebook streamers will consider buying.

1 thought on “Streaming With a Mackie DL32R Mixer”