[toc]
Introduction
In my previous entry, I went through the new Mac Pro 7,1 that I just purchased. The intent of this post is to go over how I integrated the new machine in my office. Specifically how I fit it into my existing peripherals, displays, the mouse and keyboard, etc. I don’t expect this to be a long entry at all; it’s pretty easy stuff.
Before The Pro
Prior to the purchase and installation of the new Mac, my desktop was shared between my gaming PC, and my employer-provided Macbook Pro. I don’t use a KVM to share the mouse and keyboard; instead I just have two different keyboards and mice on the desk. The keyboards are both provided by Unicomp, and are their IBM M clones. Buckling spring keyboards are the only keyboards worth using. They make an M-like keyboard with Mac keys, so that’s what I purchased for my laptop.
Displays
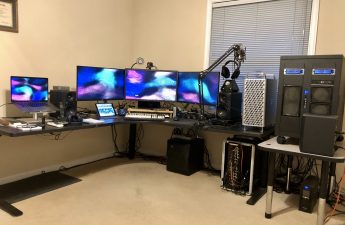
If you reference the gaming rig’s link, you’ll see that I have three 27″ 4K displays. The center one can do 4K at 144Hz if it’s connected to a capable GPU via DisplayPort 1.4. It also has a single HDMI connection which can handle 4K/60Hz. My gaming rig is using the DP so that I can do the high refresh rate along with NVidia’s GSync tech. The Mac laptop? As it turns out: 4K/60 is fine. So: HDMI. In fact, the other two LG panels also have HDMI connections. They each have two connections; remember that.
To power those three displays from a single Macbook Pro, I could homerun HDMI-to-USB-C cables from the displays to the laptop. Then I’d need a fourth connection to power it and provide USB ports for the mouse and keyboard. Instead of doing that, I picked up two of CalDigit’s TS3 Plus docks.
You can see in how I placed the two docks; I have the display on the left powered from the left most dock. The center and right displays are being powered from the right dock. After I had all of that set up, I could switch between gaming (DisplayPort) and work (HDMI) on each of the displays, easily enough.
Sound
I wrote a long post about how I handle the sound in my office at the end of 2018. Some things have changed, but the basis is still the same: a Mackie DL32R at the center of it all. There’s a section in that post that describes how I have my Macbook Pro integrated with the sound system. The Schiit DAC is long gone, and has since been replaced with a Sound Blaster X7 USB DAC/ADC. The primary reason behind this is that I do a lot of web-based conference calls at work. I wanted a way to cleanly get audio from my mixer into the Mac. And the X7 has RCA connections for both input and output. It presents itself to the Mac as a stereo input and stereo output. Now when I’m on con-calls, I can use the microphone attached to my mixer to talk to my co-workers.
Let’s Add The Mac Pro
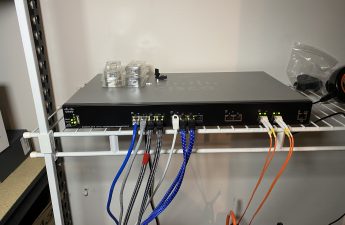
I went through all of that “pre” setup so that this makes a bit more sense. Adding the Mac Pro into the office took a little extra work, but a chunk of it was already done. I already explained the networking in my previous post so I’m not going to go into that. Peripherals are the point of this section.
Displays
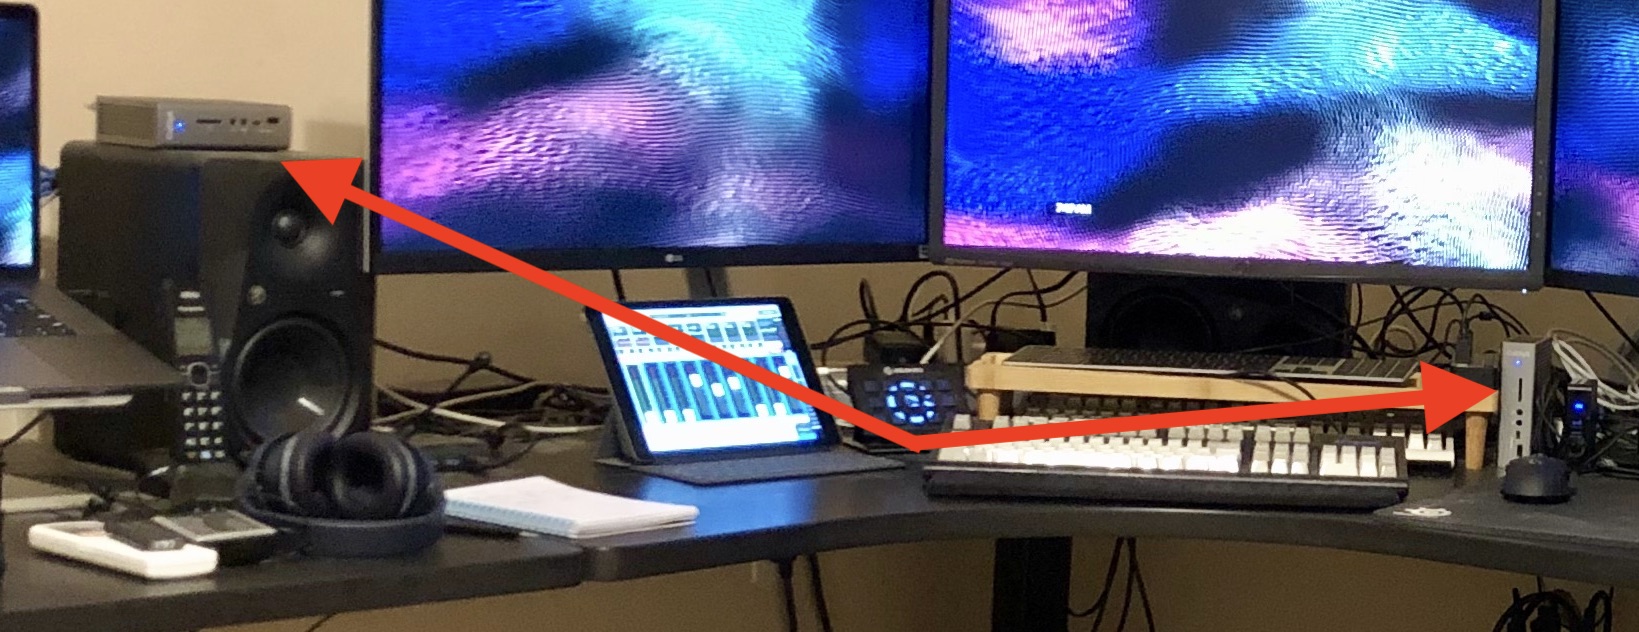
The two outer displays each have two HDMI ports on them as well as a DisplayPort. The PC is using the DisplayPort, and the work laptop is using one of the HDMI ports. Easy enough to cable the second HDMI port directly to the Mac Pro via USB-C-to-HDMI cables. Done. The center display needed an HDMI switch since it only has a single HDMI port. Amazon to the rescue: this little HDMI switch did the trick. I re-cabled the laptop HDMI and the HDMI from the Mac Pro into that switch, and then the switch into the center display. It means I have to take an extra step when changing over my displays, but it’s east enough to do.
USB I/O
I decided early that I’ll never be using both the laptop and the Mac Pro simultaneously. That means they can share their keyboard and mouse. It also means they can share the Sound Blaster X7 for sound. With that, a USB switch from UGREEN provides the easy change-up between the two Macs. When I switch it over between the two Macs, they each see the mouse, keyboard, and Sound Blaster.
Cool.
Conclusion
And that’s it, really. As I wrote earlier, this wasn’t going to be a long and complicated post. Just a simple update to the previous one explaining how I actually integrated the Pro on my existing desk and with my existing peripherals.